|
IMPORTANT NOTICE
Since this page was originally written I have not only noted a great deal of typographical errors in the text, plus others in the illustrations, I've also had the chance to do more research and consequentially rethought some of the ideas herein expressed. I will revise this document in the near future, but in the meantime, here are two photos of the first of our Japanese tents or AKUNOYA or AKUSHA, deployed in September 2015 at a recruiting event:
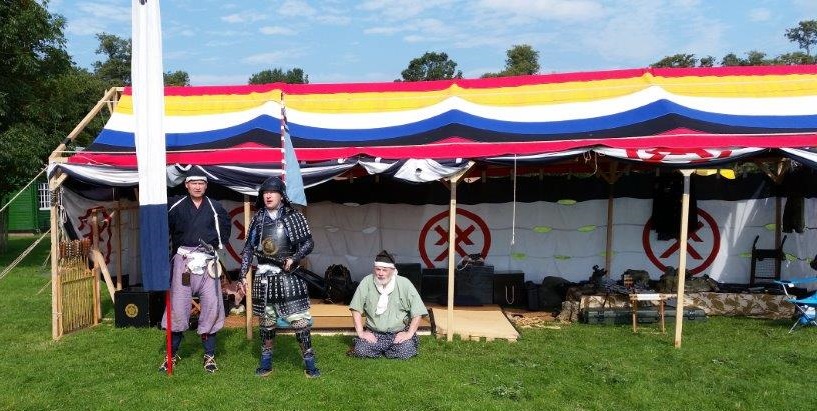
Above: the front view of the Japanese tent (AKUNOYA or AKUSHA), with JIN-MAKU (camp curtain) serving as the walls.
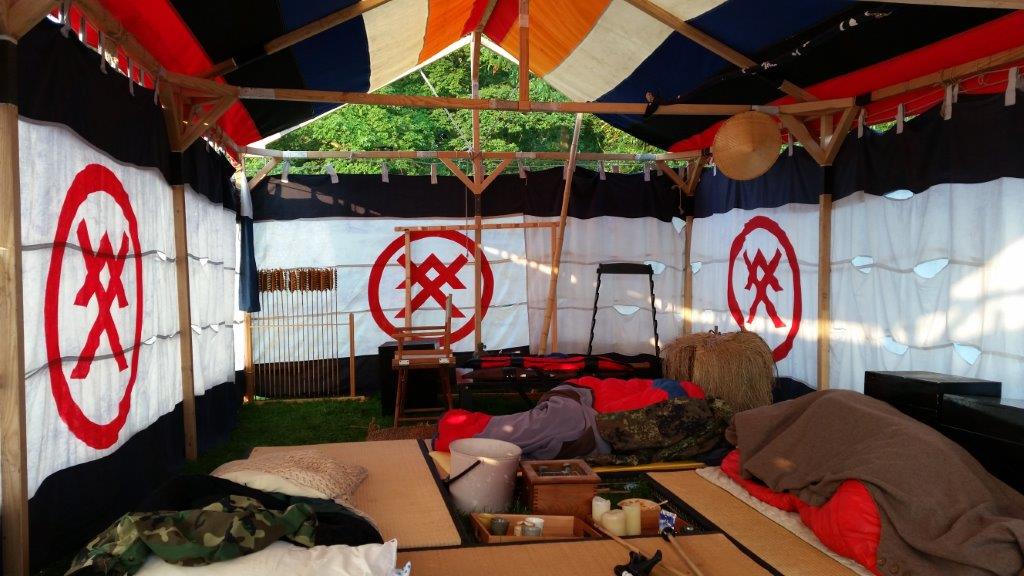
Above: the inside of the tent. This image was taken after the public had gone home on the first day, and we had closed off the front of the tent to reduce drafts. Consequentially there is some very 21st century items in view. We slept overnight in the tent with a HIBACHI (fire pot) heating the interior, very comfortable. Originally, this tent was designed to have open ends, but we have decided to add material to close it off, so as to make it cosier.
|
|---|
The SHŌGUN Tent Guide
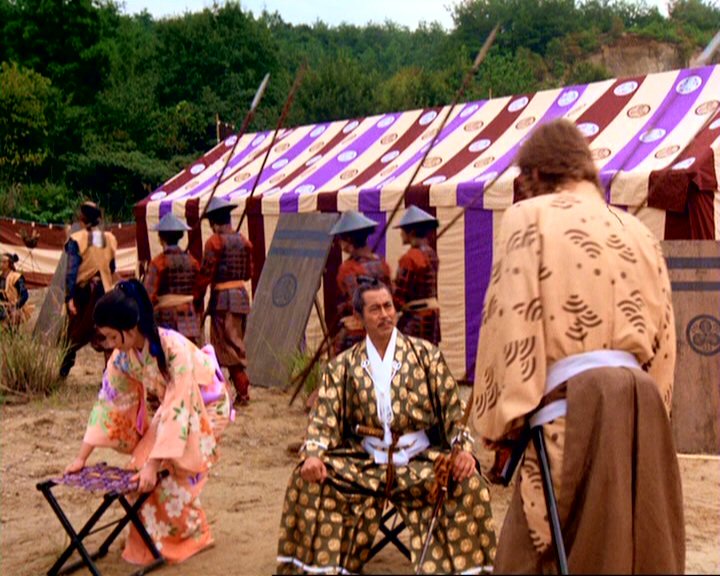
Picture 1 (Left) A scene from the 1981 TV series "SHOGUN". showing the exterior of the tent or AKUNOYA of Toshiro Mafune's character "TORANAGA". Click the image to go to Amaazon.co.uk's page for the five disc DVD set of the TV version of James Clavell's best selling book. A bargan at only £16.98 for the boxed set.
Picture 2 (Right): Our 13' tall European pavillion on display at the Will Adams Festival in 2005. Note the blue JIN-MAKU (Japanese "camp curtain") and the "Five Lucky Colours" banner in the background (see Picture 9 near the bottom of this article for a larger version).
Foreword
This page is concerned with the practical issue of making replica historical tents, and other camp structures such as the curtains (JIN-MAKU) that surrounded a Japanese warlord's headquarters, and we hope will eventually cover not only typical European and Japanese tentage, but other kinds of shelters, such as those used by the ASHIGARU (common infantry) when on campaign, and possibly one day even portable Tea Houses!
The principle purpose of this article is to provide on-line specifications for the maker of our Japanese tent. After completion, the article will be redrafted and include pictures of the results.
DON'T PANIC! This friendly statement is here to assure you that the seemingly overly complicated diagrams set out in the How To section, are intended just to be comprehensive. They are, in fact not difficult to grasp (hopefully). They are there not only to show how to do a thing, but how to avoid costly and frustrating mistakes. Although not aimed at the absolute beginner, I have detailed some basic elements, such as certain seams and hems which are also used by the Japanese. I've done this because not everyone knows the right terms for a given seam, or alternatively agrees exactly what is meant by for example a "French Seam".
A brief word on textiles: when planning any large project like those set out in these pages, you must always take in to consideration the fact that even with modern manufacturing technology, both the width and the colouring of a single bolt of fabric will vary over it's length. For making clothing this is not really a problem, as "local" variations will not make any difference, but it can do, when making something forty or fifty feet long. Historically, this was even more of a serious problem, but careful selection and matching, usually reduced it's noticeability. Personally, I would suggest that you not concern yourself too much with this issue, as the resulting varriations with modern fabrics, will probably match reasonably well to a historical example, but don't expect absolute uniformity. However, when buying cloth, check it thoroughly for serious flaws in the weave or in the dying. For example I have two bolts of pure Irish linen cloth, one of which is hand dyed in "rose madder", wherein one end is far paler than the other. Whilst the second is a burnt-umbar coloured cloth, with a weaving flaw running along it's entire length, right down the middle. In either case a bit of planning solves the problems, and means that you can use faulty textiles bought with a bit of haggling resulting in huge discounts. I was lucky enough to get my examples at circa £1.00 per metre for full bolts in 36" and 58" widths respectively. Irish linen can cost as much as £25.00 per metre in the shops, but if you go to one of the re-enactment fairs you can pick up high quality fabric at £6.00 instead, normally 60" wide. Excellent for all projects!
The weight of the fabric used historically would have probably been somewhere between that of a lightweight shirt (5oz.) through to a heavy canvas (14oz.). My current pair of home made European tents are of 6 and 8 ounce fabrics respectively, whereas the proposed commercially made Japanese one will be made up out of 12-14oz fabrics, as these will better repel heavy rainfall. Please bare in mind that these heavier materials must be sewn with an industrial grade machine as it will wreck an ordenary one in short order.
Then there is the issue of scale. Modern Europeans are considerably larger than their medieval Japanese counterparts, and so when designing any item, it is as well to be aware that on average you will need to add about 5-15% extra to your projects size, to avoid it looking too small, or make it appear as though it is being used by giants. You should also bare in mind that not only is there a scale issue, but one of differing proportions between body parts. For example, despite the hight differences, head sizes tend to be not that different, but Japanese hands are tiny in proportion to their arms when compared to Europeans, alternatively ours are huge. This difference can be quite easily seen when handling period Japanese armour. As I understand it this issue is these days less pronounced due to the improved diet of the Japanese over the last 60 or so years.
Regarding the authenticity of the various designs shown in this article, it must be appreciated that our sources of evidence are almost exclusively from art; paintings, prints, manuscripts and scrolls etc. An interpretation of these can be made, backed up by knowledge of the techniques employed in other crafts, such as sewing, printing and dyeing, for which surviving examples are available for study. However in the end the resulting designs are never more than a best guess. Therefore I have written this document, not as an accademic submission, but as a practical engineering guide for the re-enactor and live-role player, who wants to actually build one of these things for use in the field. If you have any questions, observations, suggestions etc. please EMAIL me, Dean Wayland or phone me on 01438-368177 and I'll do my best to respond. So with all this in mind read on, and hopefully enjoy.
Acknowledgements: Much thanks to Mary R. Gentle (Author) for producing the technical diagrams from my incomprehensible notes and instructions. I also wish to thank the following people who have personally contributed to and aided my research in this field over the years: Ian Bottomley (Royal Armouries/Author), Anthony J. Bryant (Author), David (Dag) Gavin (Tent & Costume Maker), Jock Hopson (Author), Mike & Sue Jessop (The Wade Collection, Snowshill Manor), Stephen R. Turnbull (Author), and numerous members of the Samurai-Archives and SCA's "Japanese" mailing lists.
Japanese Tents
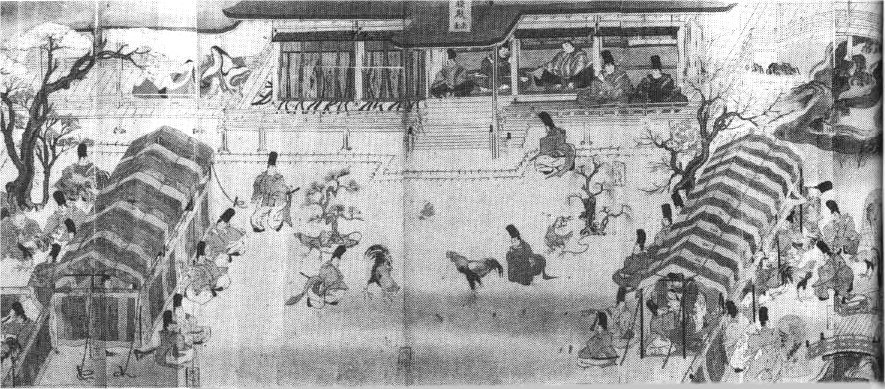
Picture 3: a late HEIAN era illustration from a scroll showing a pair of Japanese tents, being used for some kind of civilian festivities, possibly including a cock fight. (11th or 12th century). Note the open ended roof typical of AKUNOYA/AKUSHA of this era. The one at left has its wall in place.
Introduction
Japanese tents or pavilions known interchangeably as AKUNOYA or AKUSHA, were not generally used in the way that Europeans deployed their equivalent shelters. They were mainly used in the way that we today use a garden gazebo to provide temporary shelter from the sun and rain, in their case at formal events such as religious, festive or political ceromonies. However during the 16th century, at the height of the "warring states era" (SENGOKU-JIDAI) they were deployed at or near the headquarters of a DAIMYŌ ("great name" the Japanese feudal warlord), again not as a place to sleep in but as a venue for the conduct of planning meetings and the like out of the hot sun or rain. Senior warriors like these tended to take over the homes of other warriors, lords or farmers, temples or other buildings for their personal accomodation, while the common soldiery (ASHIGARU) and less well off SAMURAI, built temporary shelters, or just bedded down wherever they could find a dry spot, as soldiers the world over have ever done. As here in the UK there is a terrible shortage of suitable YASHIKI (residences or mansions), temples and a plient peasantry etc., we will be using these AKUNOYA as accomodation, complete with TATAMI (floor mats) and other furnishings. In addition it is intended that we research and try out their more primitive counterparts, the various improvised shelters made of cut wood, oilled paper and rush matting (GOZA) and straw raincoats (MINO).
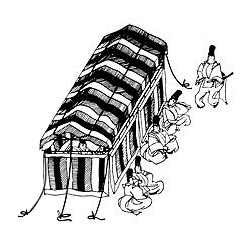
Picture 4: a clearer detail of the left hand AKUNOYA shown in Picture 3 above. The left hand guy line has been added with "Paint Shop Pro" to show how it should look when not obscured by a JIN-MAKU (camp curtain).
Basic Design
The basic form for an AKUNOYA is a rectangular ground plan with a ratio of just under 1:2 up to not quite 1:3. Like Japanese architecture, tent sizes seem to be based around TATAMI, the straw mats used for the flooring of the homes of the wealthier classes, a space being defined by the number of mats used to cover it. Each TATAMI being on average 6' x 3'. Conveniently the SHAKU, the Japanese unit of measure used for TATAMI equates to just under 12" or to be precise 303mm. The result is that AKUNOYA typically start at just under 10' x 20' through to circa 12' x 33'. Their ends are straight up straight down, whereas their long sides rise to about 6'-7' and then become a gently "pitched" roof at an angle of circa 67° down from the vertical, a ratio of 1 in 2, with a central ridge pole at their apex, ending up looking somewhat like a modern European marquis. However the tell tale features that distinguish them from European tentage, is the fabric width, it's colourful patterns, the wooden frame and reduced number of guy lines. Also in earlier versions the ends of the roof sections were not sealed, leaving a large triangular ventalation hole, see Picture 4. Note that AKUNOYA are never truely square in shape, as four is an unlucky number. "SHI" one of it's pronounciations is the same as the word for "death". Also the Japanese value asymetry in design, thus you get boxes with a lacquer design off to one side only.
Fabric
As with all Japanese textile products the original fabric was made on a very narrow loom, that produced a panel width of around 16"-18" in our period. Thus these panels were used to assemble AKUNOYA in various types of stripy pattern. A bolt of cloth was about 40'-45' long, which to some degree dictated the resulting overall size, although I suspect that special lengths were woven for such unusual purposes as a warlord's tent. Modern day "traditional" Japanese textiles are made in an extremely narrow width, circa 14", and are marketed as an "art" product, both factors of which render it unsuitable for our purposes. As to the actual materials used, hemp, linen or even cotton would seem to be the norm. The use of silk for tentage is unlikely, as this precious textile was needed for the manufacture of quality clothing. The weight of the fabric used would have probably been somewhere between 5oz and 14oz. Our proposed commercially made one will be made up out of 12-14oz fabrics, as these will better repel heavy rainfall.
An important difference between these historical fabrics and the modern European alternatives is their edge or "selvage". These early Japanese fabrics were made with a selvage wherein the cross threads of the bolt of cloth were very tightly woven back in to the body of the material, making them both very strong and essentially fray proof, illiminating the need for cutting and rolling the edges and thus no need for big seam allowances. On top of this, historically the Japanese first glued then tacked their seams together, resulting in virtually no wastage of fabric. This made products that were easy to take apart for thorough cleaning, which is fine if you have a large number of servents. As our tents will be machine made with European cut cloth, they will of necessity be sewn with finished seams, and thus a wider seam allowance must be taken into account when designing the fabric elements.
The company who we have approached to make the fabric components for our AKUNOYA, Past Tents uses a standard heavyweight 12-14 ounce fabric circa 36" (92cm) in width, which after splitting in half and sewing, will result in a "finished" stripe or "panel" of circa 16" in width, and so all our designs are based upon this measurement, see Figure 1 below.
This number of 16" is in fact dependent upon the chosen seam allowance, it assumes a finished seam of circa 1"/25mm across, which requires 2" (5cm) off the panel's width when joining three pieces of cloth together (see also Figure 18). However if the seams are tighter, than the resulting panel width will be larger as will be the completed tent. This is why the tent's frame will only be built after the fabric component has been finished. However it is vital to use the same allowance throughout your design, so that the various parts match up to one another. So pick your allowance and stick to it.
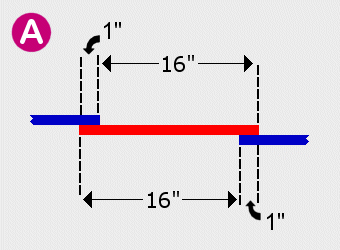
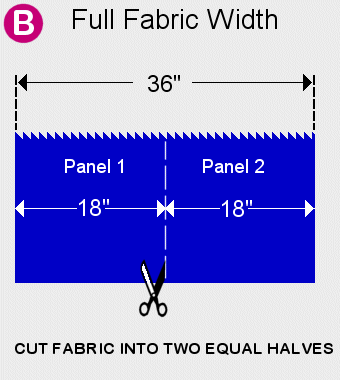
Figure 1 shows the three different cutting patterns for use with 36" wide fabric, so that the finished "panel width" is 16".
Figure 1A: The standard finished panel width, which also shows how the panels overlap when three are sewn together. The exposed faces of the red panel are 16" across, and the total seam width is 1". See Figure 18 for details of how the panels are actually joined together.
Figure 1B shows the splitting of the cloth in to the standard 18" panel width used for the majority of tent parts.
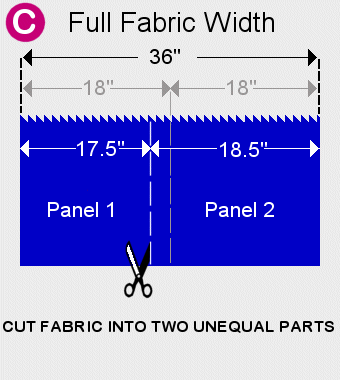
Figure 1C shows the cloth being cut asymetrically in to 17.5" and 18.5" widths, which is necessary when making certain special panels, wherein a normal width would result in the finished panel being too wide or too narrow.
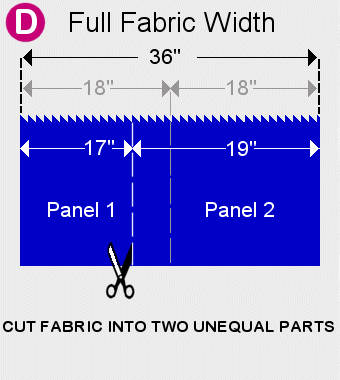
Figure 1D shows the other required asymetric cutting pattern for the 17" and 19" panel widths.
Rather than giving precise measurements, tents are principally described in terms of the numbers of panels used (actual or theoretical) in their length or width, and sometimes height. Note that where I have given actual dimensions that they are based on the 16" figure, but this should be regarded as only a guideline, unless otherwise stated in the accompanying text.
The number of panels used in the design of a AKUNOYA is always odd, for example 7 wide x 15 long, 9 wide x 19 long or 11 wide x 25 long, as even numbers are not considered as auspicious. Tents with walls including vertical stripes and intended to overlap by one panel to seal the doorway always end up with their finished walls having an odd number of panels in total. For example each wall of a 9 x 25 panel tent would be 35 panels long, that is: 9 + 25 + 1 = 35.
I have no direct evidence to support the idea that the walls "overlapped" at the doorway of a tent. Indeed the only actual "doorway" form I've clearly seen is in one illustration has the ends of the walls merely butted together. See the right hand corner of Picture 4 above. Usually no doorway is visible whatsoever. Only in films like "SHOGUN" is it implied that the door at the centre of an end wall overlaps. However, many years of sleeping in drafty period tents, has convinced me of it's virtue! Also, as I mentioned above the Japanese prefer to avoid even numbers, so I suspect a wall section would be made to overlap for this reason, as well as keeping the rain and wind outside of the tent.
Colours & Decoration
The range of available colours and patterns was wide, but mainly shades of red, blue, yellow , white and less often black were the principle choices. Green, orange, pink, burgundy and brown also seem to be an option. Unlike Europe, with the exception of painted or printed crests, there seems to be no evidence of anything other than plain cloth being used, so no brocades or damasks or the like. The plain strips of cloth were arranged in various "stripy" patterns, either plain vertical, horizontal, or a combination of the two. Vertical patterns were very common with ones having either either a single or a double horizontal stripe in the otherwise vertically striped wall, being next in popularity. All horizontal striped versions seem to be less common, plus this form seems only to be associated with the earlier style in which the end portion of the roof section is left open to the elements.
Now, the diagrams below look like an explosion in a paint factory, as the shades used are a wee bit bright, which although in theory would have been fine for our period (1543-1640) a very colourful age, period technology wasn't quite up to this degree of eye-popping harshness. These colours have with the exception of the "burgundy" and "golden yellow" used in Figures 40 & 41 , been selected as they are "web safe". So our replica AKUNOYA will in practise (fortunately) be somewhat more muted/restrained in their intensity especially after exposure to direct sunlight, so sunglasses will not be required, although for viewing this page, recommended.
KAMON meaning "family crest", are the heraldic devices seen on flags, armour, household goods etc. These MON (crests) like the School's crossed swords logo at the top of this page, were also painted on to tents, or more often created during the cloths dying process. For us, it will be Dylon fabric paint, templates, brushes and patience!
KAMON can be placed all over the fabric, or laid out in a more conservative pattern. Typically they are about 12" across and rendered in either black or white to contrast against the background colour. Coloured MON do appear but seem to be less common as far as I can tell.
Components Of An AKUNOYA.
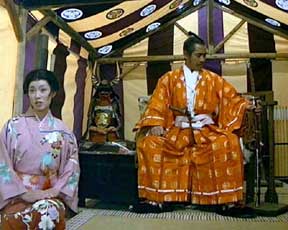
Picture 5: interior shot from the TV series SHOGUN, showing their interpretation of the tent's supporting wooden frame.
AKUNOYA comprise four elements:
-
A substantial wooden frame. See Pictures 4 & 5 above for a light and heavy option respectively, plus Picture 6 below. The precise design of this frame is a matter of some debate, and we fully expect to have to design and redesign, and possibly, but hopefully not, rebuild it, as time goes by. Scrolls show designs with either 5 or 6 vertical poles along each long side, and 2 or 3 across the width at each end (see Picture 6 below), but non in the interior space. Laid on top of these were horizontal poles along its length and width. The cross beams could be mounted a few inches below the level of the longtitudinal poles. A central "ridge" pole running along the apex of the roof, was supported by either a single short vertical pole mounted to the cross beam, or an extention to the central centre end pole (if present). Alternatively it might use a heavier arrangement as shown in Picture 5. Instead of a simple cross beam with a verticle post at it's centre, we have an "A" frame truss using a "king-post" type construction. NB: care in interpretation of the photo above must be taken as in the first place, its a TV show, and in the second the layout is optomised for moving camera and actor positions about and not for the practical business of keeping out the wind or rain, or even the artistic desire for matching the wall to the roof!
-
No more than six guy lines with stakes, and other ropes/ties. Three at each end, secured to the frame, emerging from below the fringe of the roof section. NB: to date I have not seen an illustration of a tent with a guy line coming through, or directly attached to, the fabric of the roof or wall.
-
A multi-panel cotton/linen/hemp roof section, which is sometimes held down by a longtitudinal rope on the outside about two thirds up its slope (see Pictures 3, 4 & 6). No other means of securing it to the frame can be seen, but it would seem unlikely that no ties were employed. So we will install ties in the same method as sometimes used on clothes and armour. That is, first two holes are created by using a succession of blunt instruments (busk-awl & knitting needles) to open up the fibres. Next a tubular cord is then passed through the first hole from the inside (in this case), looped back through the other hole. Then the fabric is manipulated to cause the fibres to close up around the cord. finally the ends of the cord are finished in a trumpet shaped end, to prevent them from fraying and being accidentally pulled out of their position. This is done by pushing the cut fibres of the tubular cord back into it's own hollow centre, and applying a dab of glue to secure them in place. This is the same technique as used on the round cords of an armour. (Illustrations in preparation).
-
Two cotton/linen/hemp wall sections identical in form to a JIN-MAKU or camp curtain (see Picture 7), but normally without the "windows" that serve as "wind slits", suspended by a long rope passing through loops affixed to the top of the MAKU, which is in turn affixed to the internal wooden frame. The ends of the MAKU can either abutt or over-lap by one panel normally at the centre of each narrow end of the AKUNOYA, see Figure 2 below. In some early illustrations (see Picture 4 above), the doorway is at a corner instead. Sometimes shorter internal curtains were suspended from the cross-beams for increased privacy or warmth. In summer, mosquito netting could be hung up in the same manner for more comfort.
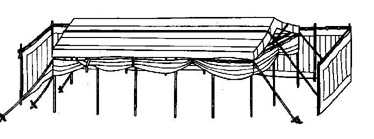
Picture 6: an illustration from a scroll showing an AKUSHA with both horizontally striped roof and walls. Note that the walls themselves have been rolled up and tied to the frame, and that another JINMAKU has been erected around it. This AKUSHA has a 6 x 3 vertical pole layout, making it quite long. Note the rope running across the top of the roof, which is of the open ended form. Here you can see some of the internal structure, as well as the "V" shape that the two roof ropes make at each end. The surrounding JINMAKU appears to be suspended from wooden poles rather than ropes. This image also serves as a link to the only other English language web site dealing with Japanese tents, SENGOKUDAIMYO.COM written by Anthony J. Bryant, American author and Japanese re-enactor, which also has some other nice illustrations, click his image above to go direct to his tent page.
The AKUNOYA/AKUSHA Diagrams
To aid in describing the layout of the AKUNOYA, Figure 2 is a plan view of a generic Japanese tent, with a compass rose at its heart. Thus the walls can be identified as either the North or the South wall, while the entrances will be either the Eastern or the Western doorway. Each of the four corners can also be identified by for example the description "the north western corner, being the hinge of the western doorway". This diagram also shows the way the walls over-lap by one panel width (16") at the centre of each end, forming one possible version of the doorways. The arrow marks how you gain entrance by pushing the inner fabric aside, see the western doorway below:
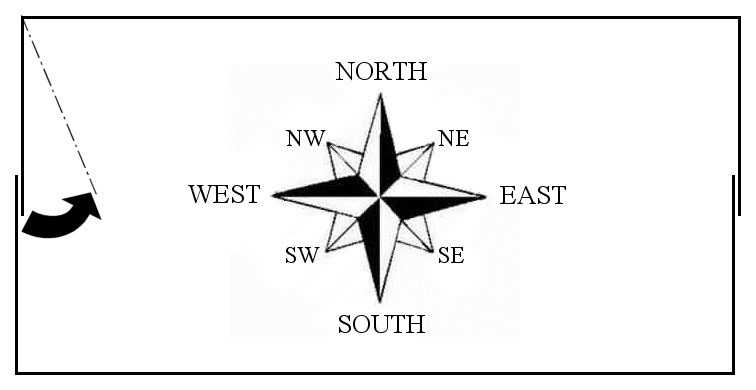
Figure 2. An aid to design descriptions. NB: also shows the arrangement of the over-lapping "doors" at each end.
With the exception of the wall-less "gazebo" like shelter Figures 8-12, all our designs use a vertically striped roof panel, see Figure 3. The bottom of this upper striped portion denotes the lowest edge of the roof section itself, which always overlaps the wall with a fringe. Above this on the side views is a black line that represents the change in direction from the vertical portion of the roof section to the sloped or "pitched" portion. This change in direction is shown at 6' 8" above the ground (which is here represented by the long green panel with the warriors standing upon it). As stated above the lower vertical portion of the roof panel slightly over laps the top of the wall by about 9", which is why when there is a horizontal stripe at the wall's top, as opposed to a purely vertically striped type wall, this horizontal panel is shown as narrower in width than its compatriot running along the ground (see Figures 3 & 29 for comparison). In fact both the outer faces of these horizontal stripes are the same width at 16". The bottom edge of the wall's upper horizontal stripe, and the top of the one running along the ground is also marked with a black line, so as to make it clear that these are seams between seperate panels of otherwise identical coloured cloth (see the red panels on the walls in Figure 3). All our designs have centred doorways of the over-lapping panel form, therefore a black and white vertical line is shown in the end views, drawn on the open edge of the over-lapping panel to show its position. These always overlap left over right in the same manner as for KIMONO, as right over left is only done on the garments of a corpse.
For reasons of clarity, the three guy lines and stakes that should be present In the end view diagrams have been omitted, and are only shown in the side and one of the plan views. As mentioned above, there is sometimes another rope running along the upper face of the roof, to aid in securing it, again we have omitted this, along with its "V" portion that would otherwise be seen in the end views (see Picture 4 above).
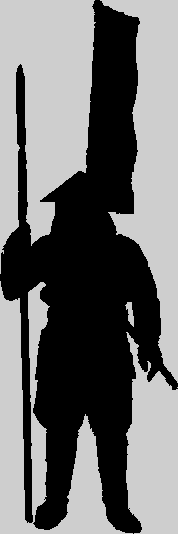
The SAMURAI and ASHIGARU figures are there to give you a rough idea of scale.
In some of the sewing diagrams I have used the terms "inside" and "outside" to show whether the "face" indicated is on the outside or inside of the tent. Elsewhere I have used the sewing terms "wrong side" or "right side" which for our purposes here equate to inside and outside respectively. This has been done because these illustrations will also be used in clothes making descriptions, where their meaning will be more closely defined.
Finally, some illustrations such as Figures 16-18 are drawn in a exadurated "block" style, showing the fabric in an "edge-on" plan view. This has been done to hopefully make things clearer, but in all cases these technical diagrams are provided with descriptions/instructions to aid in their interpretation.
Proposed Tent Designs
The following is Option#1 of three, our first choice for an AKUNOYA. It is a 9 x 25 panel design, arranged as per our version of the 5 lucky colours banner, as seen in Pictures 7 & 9 below, that is red, yellow, blue, white and black. Size: circa 33' 4" long x 12' wide x 9' 8" tall. This pattern was selected so that it is immediately distinguishable from a European tent of similar size and shape, whereas one of plain stripes could be mistaken for a European marquis. Having gone to all this effort and expense I'd like to ensure that it is clearly distinctive. The illustration has now been updated to include the positions of the proposed MON (crests) that will be painted on at a later date.
If necessary, Option#2, a shorter 21 panel version can be built instead. All that is required is to remove four panels from the centre of the design. See panels 17, 18, 19 and 20 of the main roof and walls of Figure 14 below. The shorter tent will be circa 64" shorter at 28' long. The design can be further reduced by another 32", to a 19 panel model, Option#3, by removing panels 16 and 21 as well, making it 25' 4" overall.

Figure 3: Side View.
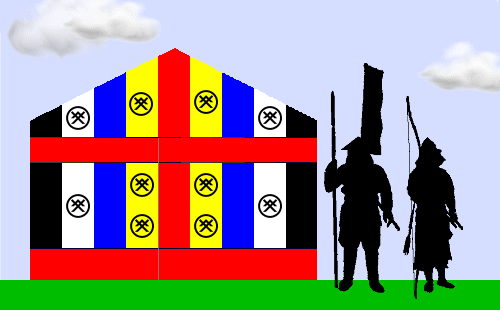
Figure 4: End View (both ends are identical).

Figure 5: Plan View: note the black line at the centre that indicates the apex of the roof. Also note the sets of three guy lines and pegs at each end of the AKUNOYA.

Figure 6: The roof section being used as a stand alone shelter.

Figure 7: The wall being used as a JIN-MAKU or "camp curtain", supported by special poles with iron hooks and decorative finials, built for the task. It is shown laid out in an "[" shape, so that only the middle 25of it's 35 panels are directly visible.
AKUSHA
I have used the Japanese term "AKUSHA" here, as it seems to be more commonly used for the earlier form of tent that this design resembles. In fact I believe the terms "AKUNOYA" and "AKUSHA" are more interchangeable than my artificial division implies. This kind of awning is intended for use when working or playing outside as a temporary sun shade come rain shelter. However, it can be upgraded in to a tent proper by the addition of a pair of JINMAKU, see Figure 8b. The true distinction lies in the fact that the ends of the roof section are not sealed. It is shown in the two possible options for our proposed first version of one of these devices (in addition to our AKUNOYA). They differ in construction only in terms of their length and final appearance. Its frame will be the same size as a 9 x 21 panel tent (12' x 28'). This means that two of our existing circa 42' JIN-MAKU (camp curtains, Picture 7), can be affixed to it's sides to provide additional protection.
As mentioned above, unlike the other tents, the roof section is open at its two ends, and in the first example (Figures 8 & 9) you can see the tips of the supporting poles projecting beyond the canvas. Alternatively the roof fabric may be made longer and allowed to drape over the pole ends forming a short fringe like border at each end circa 9" deep, like those along the long sides, see Figures 10 & 11.
This open ended design lends itself more easily than the closed off variety to a horizontally striped pattern, so this is what we intend to use, as it will render it even more distinct from it's European counterpart. The coloured stripes are arranged, would you believe, as per the days of the week, five of which are named for the Chinese elements, and goes as follows: starting from the bottom, we have red ("fire-day = Tuesday"), black ("water-day" = Wednesday), blue ("wood-day" = Thursday), white ("metal-day" = Friday) and yellow ("earth-day" = Saturday), then back to red. Another reason for our choice of this arrangement of colours is that when standing under it, the darker shades are at eye level, providing the best protection from direct sunlight, whereas the paler colours are towards the centre and above the head, making the interior hopefully brighter. NB: in Figure 12 the black horizontal lines between the coloured stripes mark the seams, which are arranged like a tiled roof to aid in the drainage of rain water. See also Figures 9 and 11 which indicate this "tiling" by exadurating the overlapping effect of the higher panels over the lower ones.

Figure 8a: Side View: note the wooden pole tips protruding from each end, the roof fabric being shorter than the frame.

Figure 8b. this is the same version of the AKUSHA fitted with a pair of our JINMAKU to provide superior shelter. See Picture 7 below for a photo of our JINMAKU.
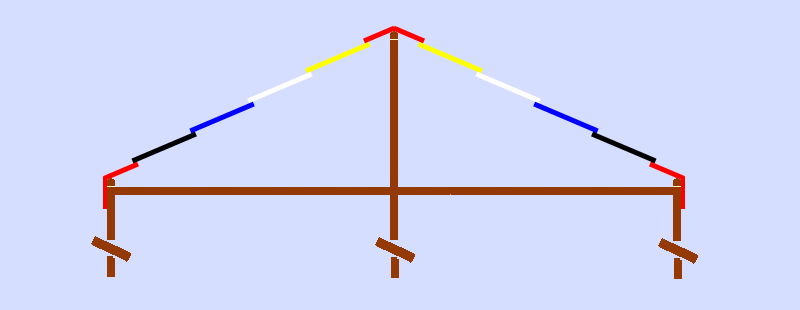
Figure 9: End View: note the vertically hanging fringes at the sides only and the top of the internal frame. NB: the roof has been illustrated with an exadurated "tiled" structure to more clearly indicate the over-lap arrangement of the roof panels.

Figure 10: Side View: note the absence of the wooden pole tips at each end, the roof being longer than the frame, providing it with a fringe at the ends as well as the sides.

Figure 11: End View: The fringed version, created by the excess roof fabric hanging over the end of the frame. NB: the roof has been illustrated with an exadurated "tiled" structure to more clearly indicate the over-lap arrangement of the roof panels.
Figure 12: Plan view of awning as though laid out upon the ground. Sizes:
Option #1: 11 panels wide, and equal to 21 panels long, that is: 28' x 14' 8".
Option #2: 11 panels wide, and equal to 22 panels long, that is: 29' 4" x 14' 8". This gives a fringe at each end on a frame of the same size.
The How To Section
This portion of the web page contains the practical instructions for building AKUNOYA/AKUSHA & JIN-MAKU (latter TBA). Currently it only covers the fabric elements, but once we are satisfied with our designs for the internal wooden frame works for these items the details for these will be added.
Making The Roof And Walls
The following section deals with the making of the fabric components only for AKUNOYA/AKUSHA. Details for JIN-MAKU are yet to be added.
Panel Overlap Layout
The way in which the various panels overlap their neighbours is important to the final appearance of the tent. Figure 13, 14 and 15 show how this is done.
Figure 13: Getting the overlap correct.
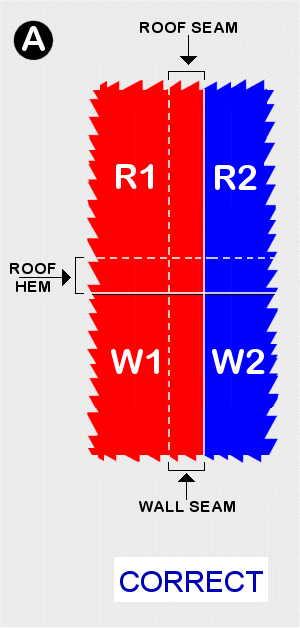
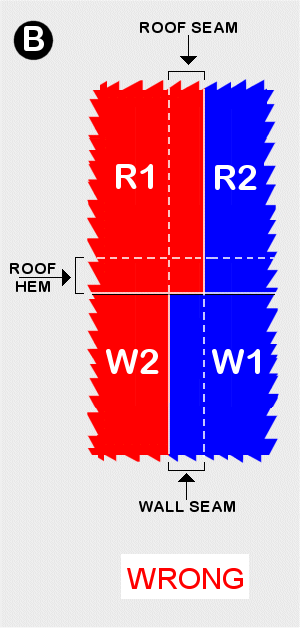
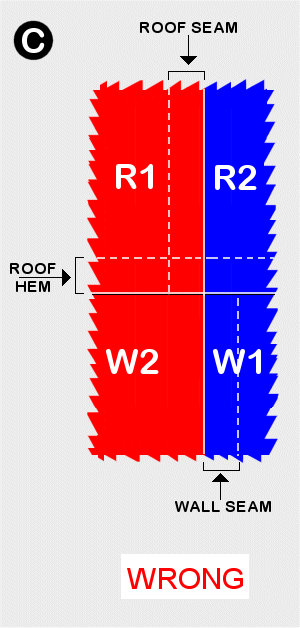
In the above illustrations we see what happens at the point where the roof fringe drapes over the top of a wall in a vertically striped tent. Panel R1 overlaps and is sewn to R2, and W1 overlaps and is sewn to W2. R1 and R2 (the roof) overhangs W1 and W2 (the wall). In Figure 13A both the roof and the wall have been made with the same "grain", in that they both overlap left over right. In Figures 13B and 13C, they don't, and we see what happens when you try to match up either the seam or the colour respectively. Both the latter stand out on viewing the tent and are clearly wrong. The solution is to make sure that you not only keep the panels the same width, by sticking to the same seam allowance, but by attaching the panels in the right way. See Figures 14 and 15 below.
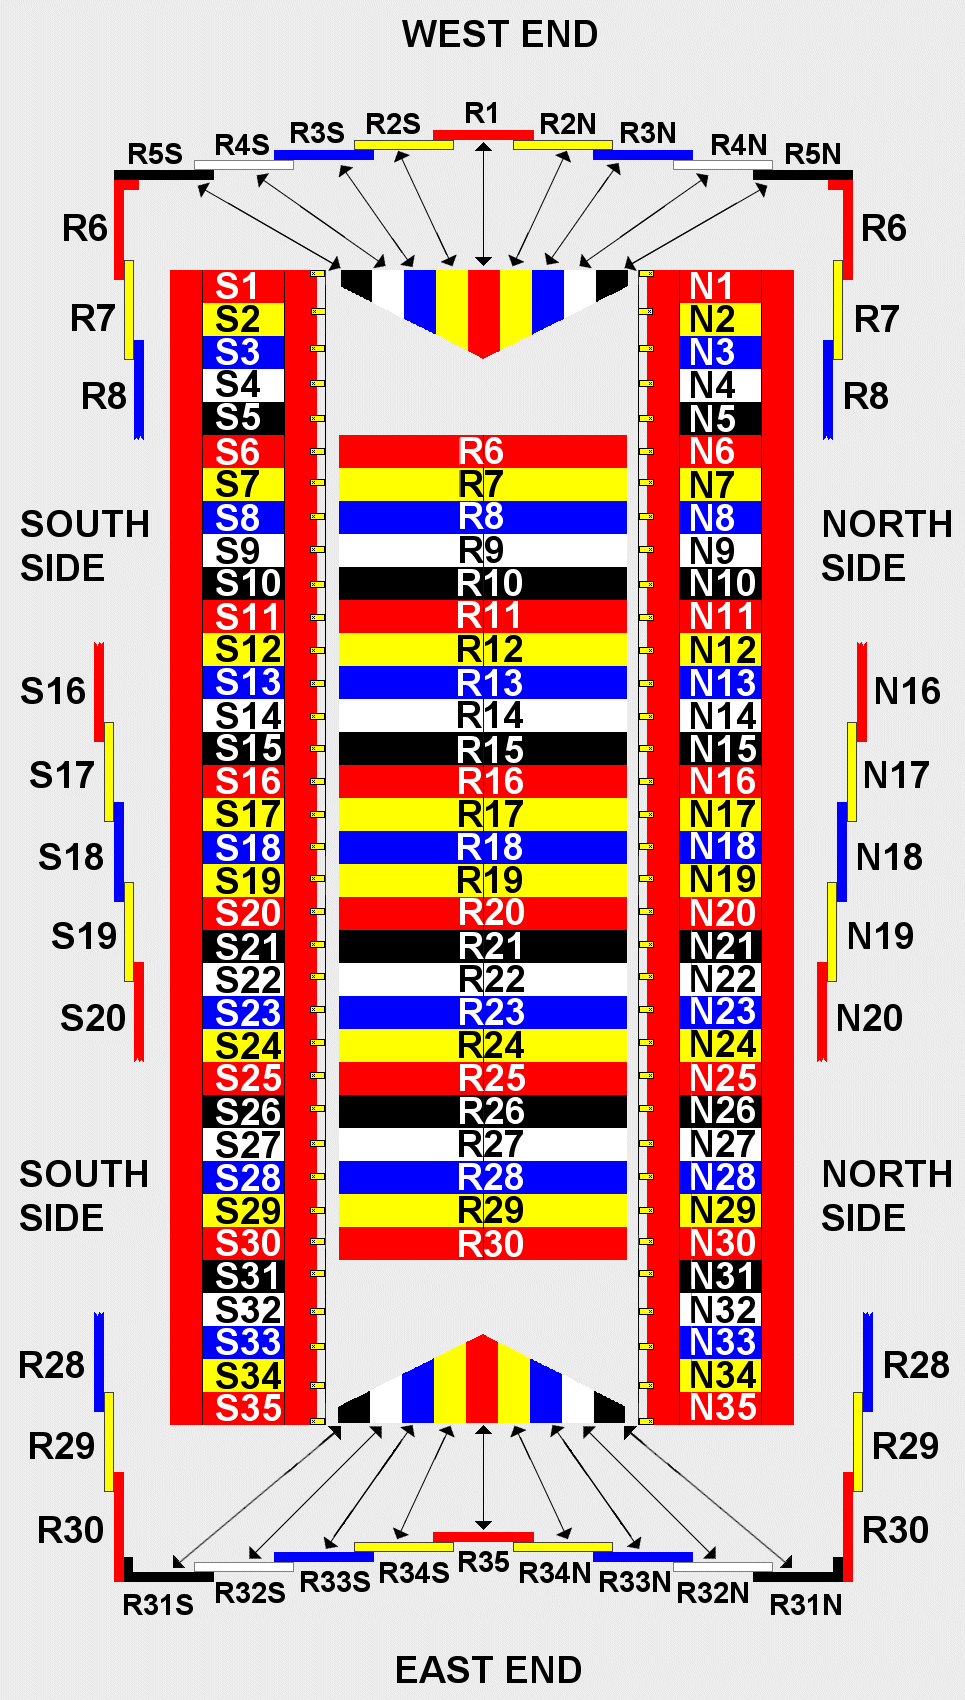
Figure 14: The Panel Overlapping Master Plan
Figure 14 shows the overlap layout for the whole tent, with all the vertical stripes tagged as follows:
-
R#
= Roof panel number.
-
S#
= South wall panel number.
-
N#
= North wall panel number.
-
R#S
= Roof panel number South side of triangular section.
-
R#N
= Roof panel number North side of triangular section.
The diagram is shown orientated in portrait format, with west to east running from top to bottom, and south to north going left to right. This had to be done as the image was too large to be displayed in the correct landscape format. In the very centre is the main roof panel, with it's two triangular inserts above and below. At left is the south wall, and at right the north. At the very top of the illustration is drawn the overlap layout for the west end triangular insert together with the first three panels of the fringe of the main roof, while at the very bottom is that for the corresponding eastern end. Arrows indicate which overlap belongs to which panel. At the far left and right at the mid-point in the diagrams length are the middle panels of each wall, showing the direction of the tiling which runs the same from west to east, and end to end.
The numbers and colours in each wall corresponds to it's counterpart in the roof section, with an additional identifying suffix in the panels of the two triangular end sections. Panels N1, S1 and R1 and N35, S35 and R35 are the central panels of each end of the tent's walls and roof, whereas panels N18, S18 and R18 are the mid point in it's length*. The overlap arrangement runs from west to east (top to bottom in this illustration). The first number in a sequence overlaps the following one. By the way, this tiling effect is identical to that used in putting together the iron plates of a Japanese helmet or KABUTO. Following this design will result in all the seams and colours lining up correctly as in Figure 13A. Because this design has a horizontal stripe along the top of each wall, seperating the stripes of the roof from those of the walls, you might wish to argue that this is unnecessary, but firstly it will create a width error in each end panel, and secondly I have found that if you are going to do a job, do it right and do it well, as the devil is always in the detail, and it will show up if you do it wrong.
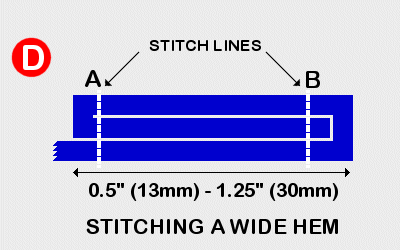
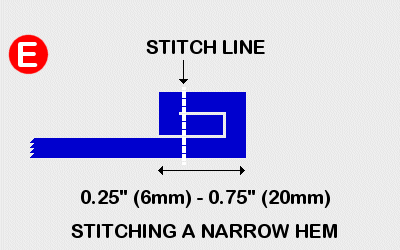
The panels are joined to one another by using the seam illustrated in Figure 18. The tops of the walls, and the bottoms of both roof and walls are hemmed as per Figure 17. The narrow ends of the walls are hemmed as per Figure 19, and the loops (aka tabs) are made and installed as per Figure 20. For our design of wall you also need to consult Figure 16A, for other options see the rest of Figure 16.
IMPORTANT: to ensure that the two triangular sections end up as the same width it is vital to cut the cloth for the central panels of the walls and roof at each end asymetrically, as follows (see also Figure 1C & 1D):
-
Panels S1 & N1 = 17.5" and S35 & N35 = 18.5".
-
Panels R1 = 17" and R35 = 19"
This will make the finished width of every panel when viewed from the outside look the same at 16". Because of the way the overlap is done, it will also make the overall length of the triangular roof sections the same. Not to do so would result in a missfit and distortion of the roof, as the western end would be an inch too wide, and the eastern end an inch too narrow overall. See also Figure 15.
*If it is decided to go for either of the shorter options in the same color scheme, then for Option#2, after panels 17, 18, 19 and 20 have been removed from the design for the main roof and the two walls, then panels S16, R16 and N16 become the new mid point in the length of the tent. In Option#3 the mid-point becomes panels S15, R15 and N15 after panels 16 and 21 have also been removed. For ease keep the numbers for the following panels the same, unless you really want me to tell Mary that you want her to redraft the image!
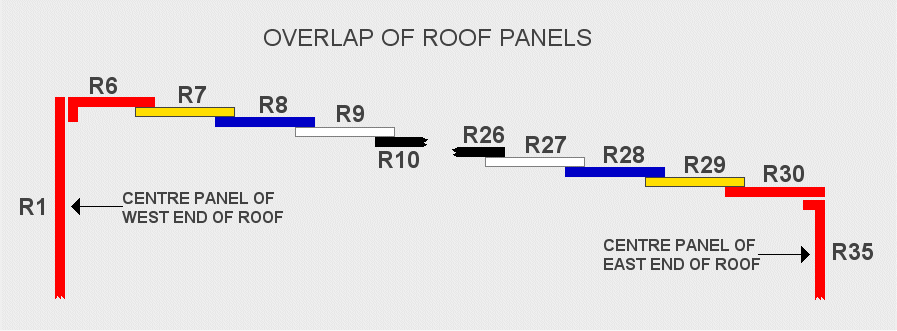
Figure 15: Overlapping Of The Roof Panels.
Figure 15 shows the panel overlapping arrangement for the central portion of the roof. Again as per Figure 14, you can see that the overlap runs from west to east. The tiny gaps between R1 and R6, R35 and R30, is there purely to highlight how these otherwise identically coloured panels attach to one another. There really isn't a gap there!
The actual height of the triangular end sections at there centre is, despite the effect of the exadurated "tiling" shown in the above illustration, in fact the same at 45" when fully finished. The two ends only differ in that the western end has a 1.5" total vertical seam allowance, whereas the eastern end has a deeper 2.5" one due to the differences in the way the panels overlap.
Tent Wall Vertical Overlap Options
Figures 16A-D below shows the various overlap options that create the illustrated wall patterns. Although Figure 16A is the one relevant to our proposed tent design, I have shown these diagrams together here for your convenience.
|
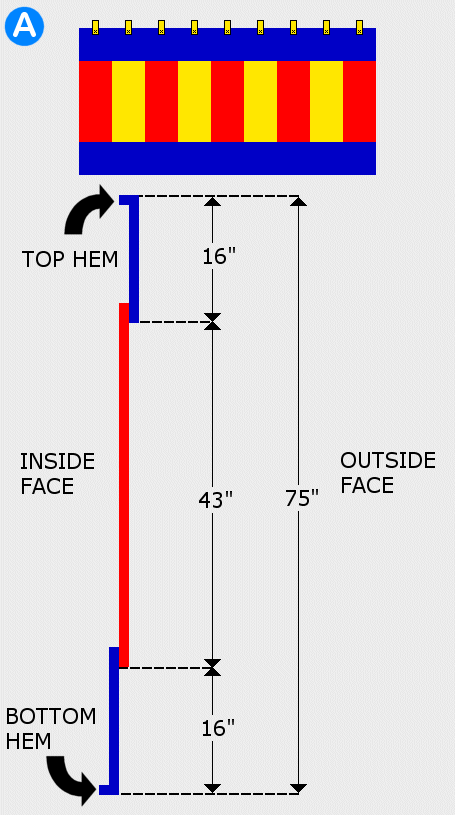
Figure 16A: For this style of wall the two long horizontal strips need to be cut asymetrically, see Figure 1C, the upper being 17.5" wide, and the lower 18.5", so that when finally viewed from outside they are the same width as all the other panels at 16". The two vertical end stripes are also cut to these same widths. All the other panels are cut as per normal (18"). I'd recommend cutting the long panels at least a metre longer than required as sewing can in effect shrink the fabric over such a long distance. The vertical strips need to be cut 45" long.
The vertical stripes are assembled first, using the overlap pattern specified in Figure 14, and the standard seam described in Figure 18. Great care must be taken to ensure that the whole thing remains straight, as it is quite easy to inadvertently put in a curve. The top and bottom hems should then be installed on the top and bottom panels, see Figure 17. Then these two panels should be attached to the vertically striped section using the standard seam, Figure 18. Once completed the ends of the walls should be hemmed using Figure 19. Finally the susspension loops (aka tabs) should be made and fitted, see Figure 20.
|
|
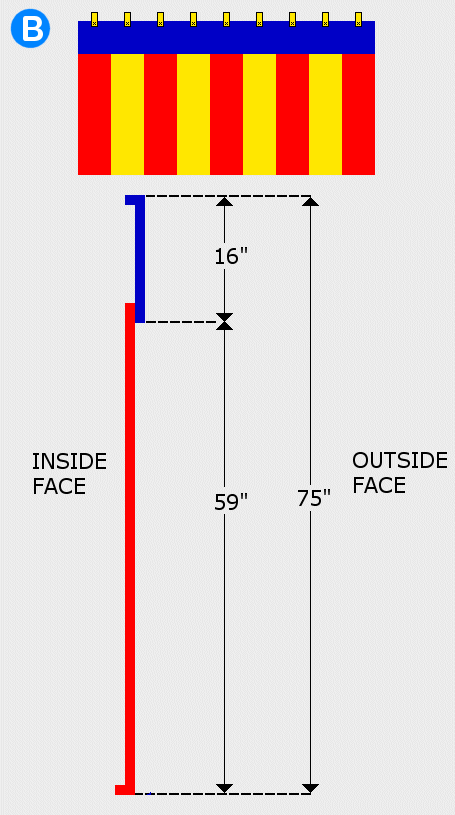
Figure 16B: For this style of wall the single horizontal strip needs to be cut to a width of 17.5" so that when finally viewed from outside it is the same width as the other panels at 16". The two vertical end stripes are also cut to these same widths. All the other vertical panels are cut as per normal, 18" wide. I'd recommend cutting the long panel at least a metre longer than required as sewing can in effect shrink the fabric over such a long distance. The vertical strips need to be cut 61.5" long.
The vertical stripes are assembled first, using the overlap pattern specified in Figure 14, and the standard seam described in Figure 18. Great care must be taken to ensure that the whole thing remains straight, as it is quite easy to inadvertently put in a curve. The top and bottom hems should then be sewn in to the top of the long upper panel and at the bottom of the assembled striped section, see Figure 17. Then these two panels should be attached to one another using the standard seam, Figure 18. Once completed the ends of the walls should be hemmed using Figure 19. Finally the susspension loops (aka tabs) should be made and fitted, see Figure 20.
|
|
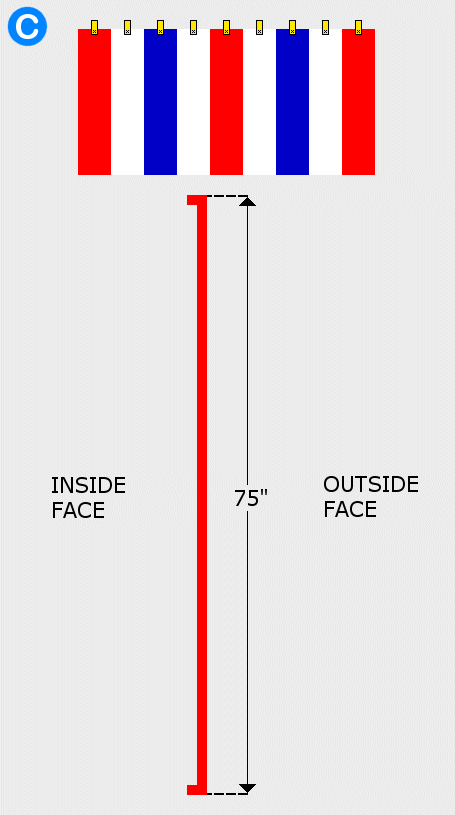
Figure 16C: For this style of wall all panels with the exception of the first and last are cut to a width of 18". The first panel is cut to a width of 17.5", and the last to 18.5", so that they end up as the same width as all the others at 16" when viewed from outside. All panels are 77" deep.
The panels are assembled using the overlap pattern specified in Figure 14, and the standard seam described in Figure 18. Great care must be taken to ensure that the whole thing remains straight, as it is quite easy to inadvertently put in a curve. Upon completion the top and bottom hems should be sewn as per Figure 17. Next, the ends of the walls should be hemmed using Figure 19. Finally the susspension loops (aka tabs) should be made and fitted, see Figure 20.
|
|
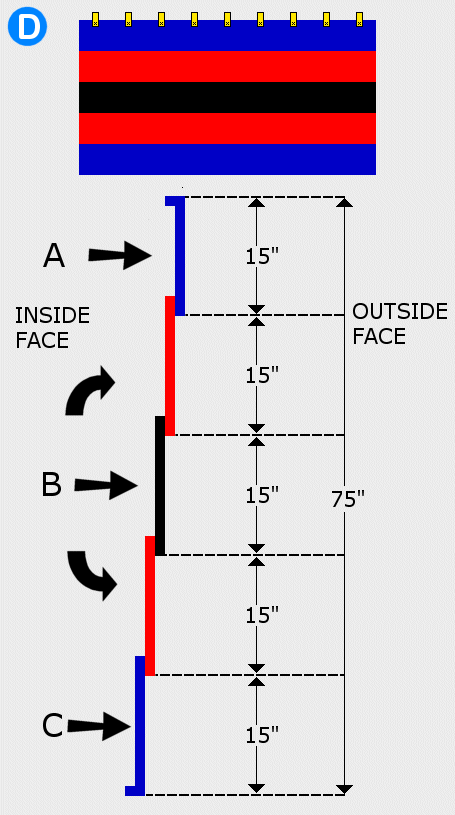
Figure 16D: For this style of wall the top and bottom strips need to be cut to a width of 16.5" and 17.5" respectively. The remaining three panels are cut to a width of 17". This is done so that when finally viewed from outside they will all be the same width at 15". This reduced width is vital to ensure that the total wall height does not exceed 75"*. I'd recommend cutting these long panels at least a metre longer than required as sewing can in effect shrink the fabric over such a long distance.
First the top and bottom hems should be sewn in to the top of the long upper panel and at the bottom of the lowest one using Figure 17. Then each of these panels should be sewn together using the standard seam, Figure 18. Once completed the ends of the walls should be hemmed using Figure 19. Finally the susspension loops (aka tabs) should be made and fitted, see Figure 20.
*You may wish to consider having your roof panels 1" narrower, so that the design is uniform. The downside of this is that your tent would be smaller and there would be more wastage from a 36" wide source fabric.
|
Making The Standard Hem
Figure 17 is the instructions for making the hems for the top and bottoms of the wall sections, as well as the edges of the roof. Note that the ends of walls, and that of the roof panels, when made with open ends, see AKUSHA above, use a special Japanese hemming technique, see Figure 19.
Making The Standard Seam
Figure 18 details the making of the standard seam, used to join panels in both wall and roof sections. This is what is called a "fell" seam, and I have shown two alternative methods for producing it.
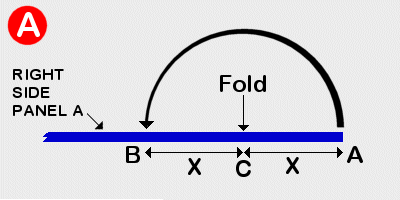 |
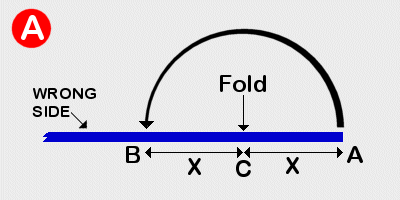
Figure 18A: The default value for "X" is 0.5", and will result in a finished seam that is 1" across.
Starting with the panel that will lie below the new one in a sequence, so that it is the right side up, that is the face that will be on the outside of the tent when finished. Fold in it's edge once, and go to Figure 18B.
|
 |
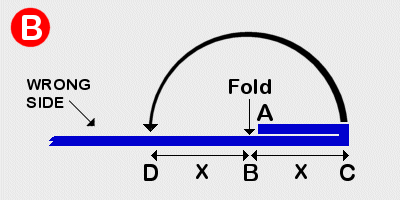
Figure 18B: Lay the new panel on top of the first one, so that it has it's "wrong" side upwards facing you. This is the face that will be on the inside of the tent when it is finished.
Move it's edge up to the turned edge of the lower panel and pin it in place, then proceed to Figure 18C.
|
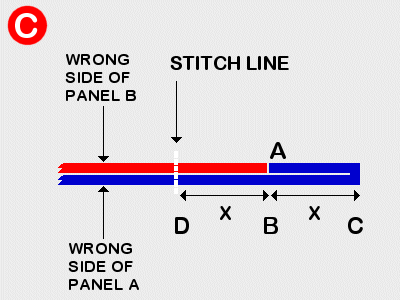 |
Figure 18C: Mark a line 0.5" from it's edge, marked as "D" , then stitch the two panels together. Proceed to Figure 18D.
|
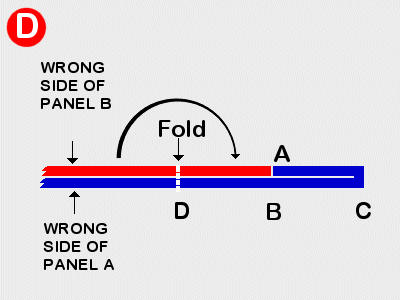 |
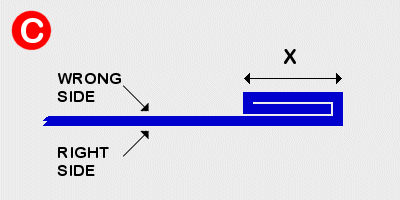
Figure 18D: Fold the new panel forward over the stitch line. And proceed to Figure 18E.
|
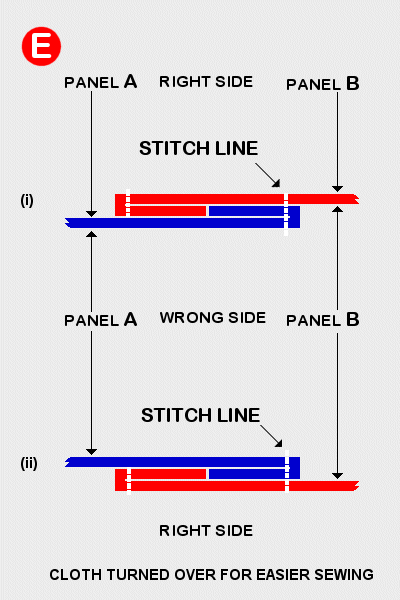 |
Figure 18E: The upper half of this image labelled (i) is here really only as a reference, that is because it is in the same orientation as the proceeding illustrations. In practise it is better to turn the whole thing over and view your work as shown next to (ii), as this will make working with it so much easier
Now, pull the new panel taught, and pin it in place. Once done sew the two panels together for a second time.
Lastly, turn the work back over to prepare it for the attachment of the next panel. Try not to get your work twisted.
Note that on the underside of your seam you will see two lines of stitching, while on the top there will only be one.
|
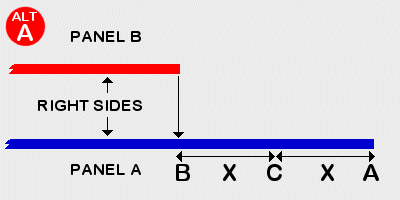
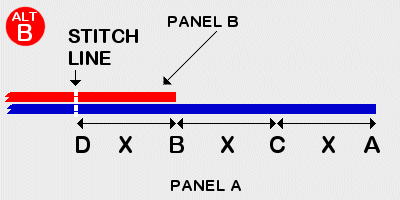
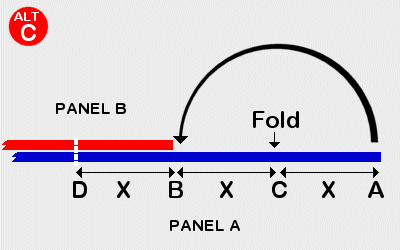
The following is the alternate method of constructing the above seam, replacing 18A-C. Upon completion of "ALT C", go back up to "18D" above and continue from there.
Making The End Hem
Figure 19 shows how to make the "end" hem which is used instead of the standard hem of Figure 17 to finish the end of a wall, or a roof panel that has no triangular end sections, see AKUSHA above. This is a classic Japanese hem, seen along the bottom edge of any garment requiring finishing, including all kinds of KIMONO.
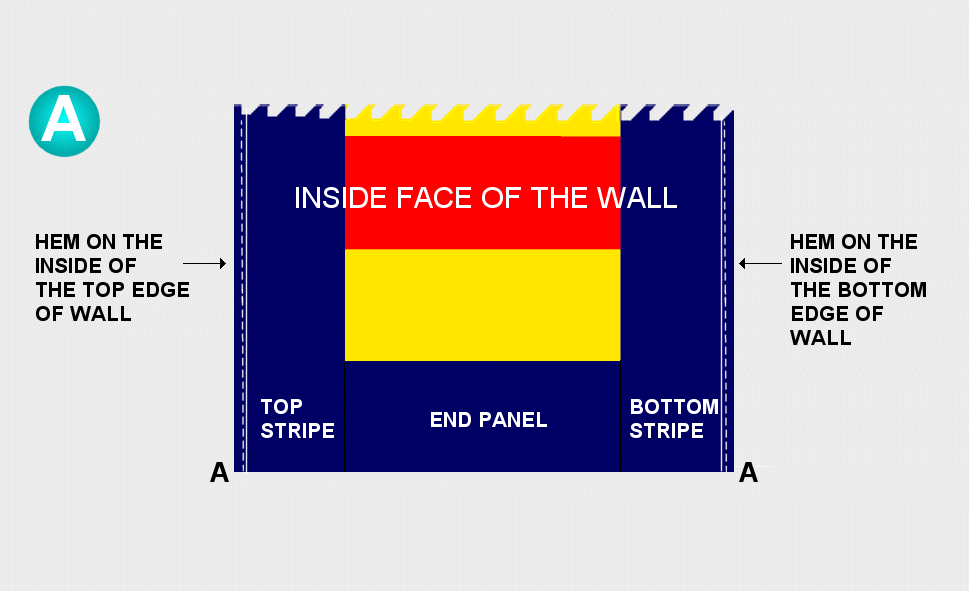
Figure 19A: This is the narrow end of the wall, wrong side up, with its top hem to the left, and bottom to the right. Rather than try to show the entire edge at the same time, the following diagrams focus just upon the corners, that is the points marked as "A" in the above illustration, any folding or sewing between these point is obviously applied to the whole length of the hem. Now go to Figure 19B below.

Figure 19B: The object here is to find and mark point "B". The default value for "X" is 0.5", being the width across the top and bottom hems, shown at left and right. To Find point "B", mulitply "X" by 2 (1"), and come in thet distance from the outside edge along the bottom of the fabric. Now go up the same distance, this should be point "B". Check that it is by measuring the distance to the outside edge of the hem. In our example the distance should again be 1". If it is correct, then mark it and label it "B". Do the same for the other side. Go to Figure 19C.
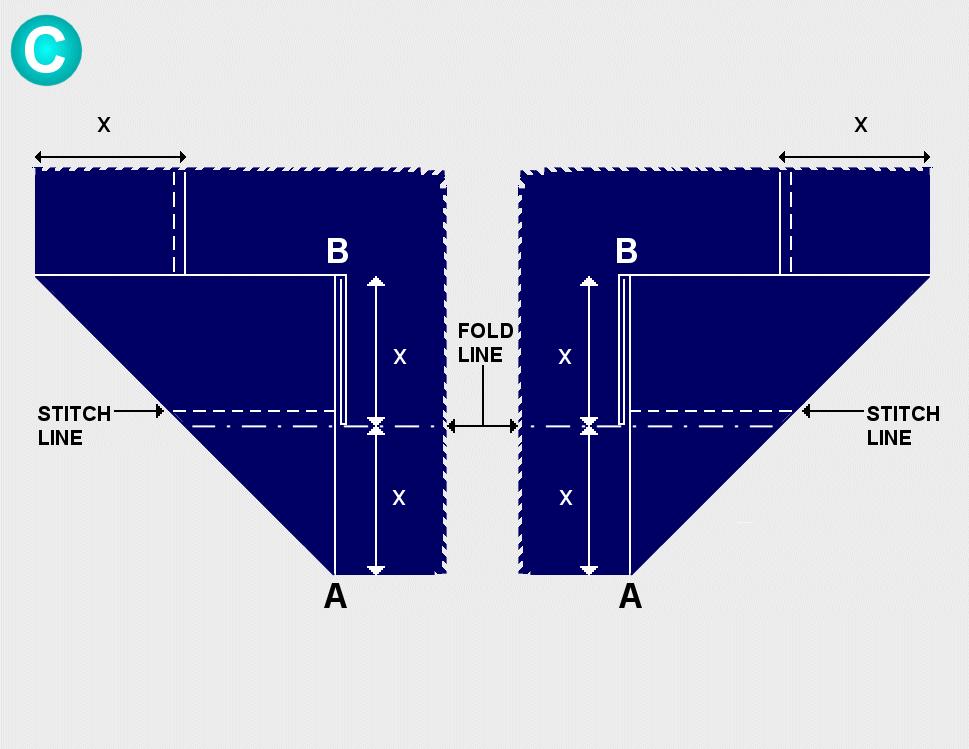
Figure 19C: Fold the corner of the fabric marked as "A" in Figure 19B above, to point "B". Iron it in place, then do the other side. Next mark a fold line parallel to the bottom edge 0.5" ("X") above it, then fold the bottom edge over once and iron it in place. Now go to Figure 19D.
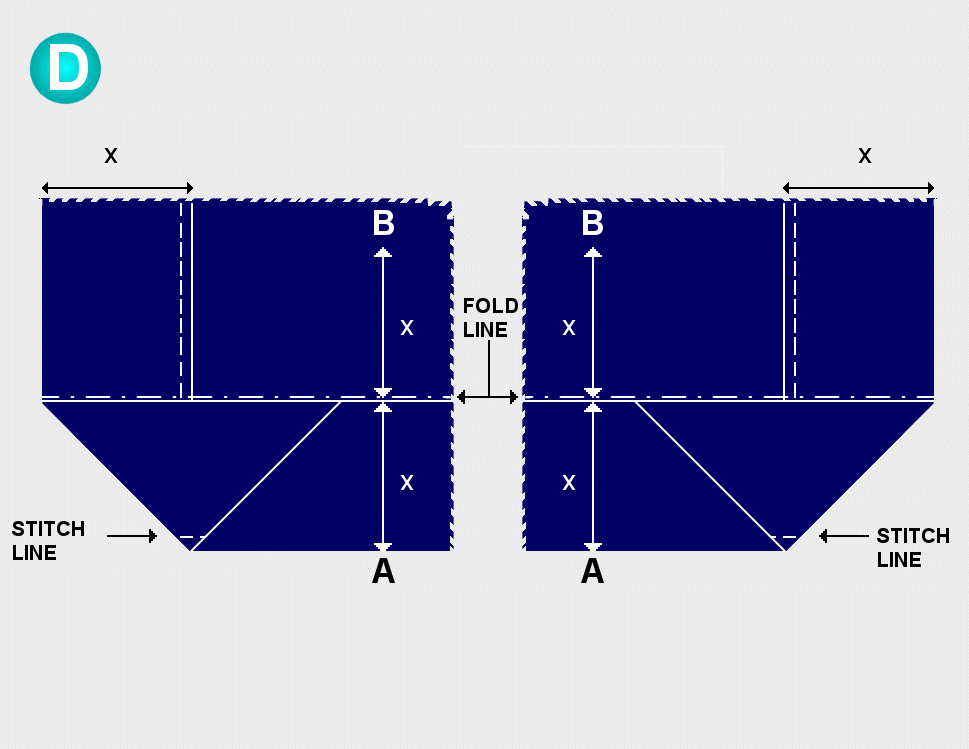
Figure 19D: Using the rough edge of the fabric as a guide, fold the bottom up once more, and then go to Figure 19E.
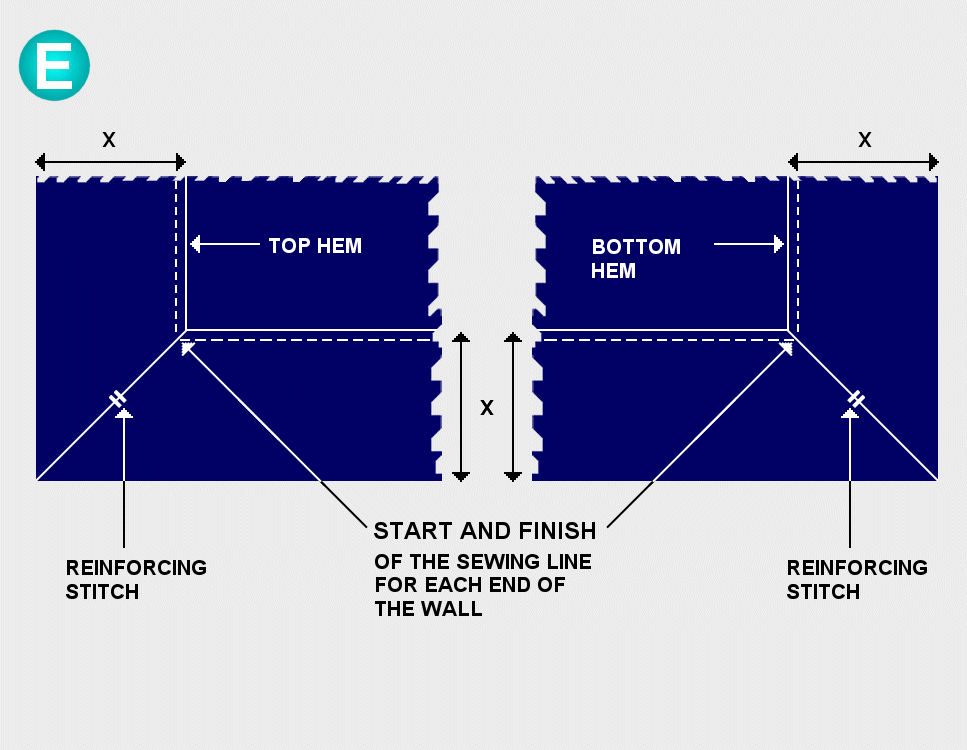
Figure 19E: Sew between the points marked to close and finish the hem. Ideally the stitch line should start and finish as close to the stitch line of the top and bottom hems as possible. Put in a reinforcing stitch to hold the corner fabric down in place. Now go to the other end of the wall panel and repeat!
Making & Installing The Tabs
Figure 20 shows how to make an install the tabs (loops) used to support the wall section of an AKUNOYA, or a JIN-MAKU via a length of rope, which is in turn secured to the supporting poles. They are normally made in a contrasting colour to their background, but are themselves always identical in colour. For our JIN-MAKU which has a dark blue top, we used pale blue tabs. For our proposed AKUNOYA yellow will be used. The specifications shown are for a loop of average dimensions. As a guide they seem to vary somewhere between 2.5"-3.5" across and the actual loop comes in at about 4"-6" in length. The sewing area seems always to be rectangular in shape, that is never square, orientated in a portrait format. The stitching shown as an "X" is invariably reinforced with a contrasting colour cross knot of stout cord in the same way as used on banners and flags, but this must be done by hand as the cord is quite thick. We will probably use black for this cordage.
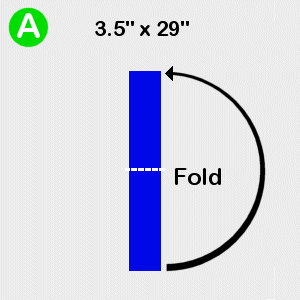 |
Figure 20A: Take your 3.5" x 29" panel and fold it in half and pin in position. Go to Figure 20B.
|
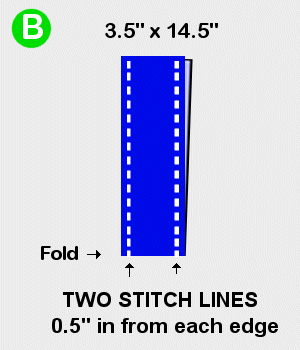 |
Figure 20B: Mark two stitching lines each 0.5" in from the edge, and thensew the two halves of cloth together. Go to Figure 20C.
|
 |
Figure 20C: Take a narrow but stout stick and use it to turn the hollow panel inside out. Go to Figure 20D.
|
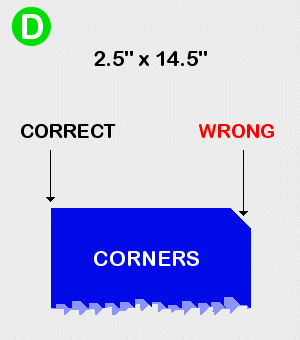 |
Figure 20D: Make sure that you push out the corners fully so that they will lay flat when installed upon the wall. Go to Figure 20E.
|
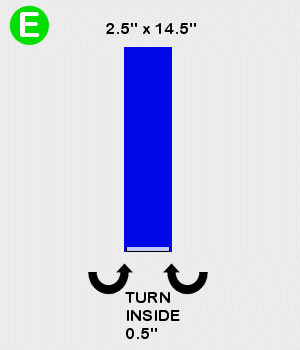 |
Figure 20E: Turn up the bottom 0.5" inside the panel and flatten it. Go to Figure 20F.
|
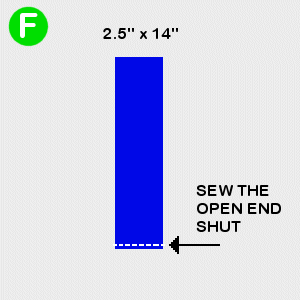 |
Figure 20F: Sew the open end of the panel shut. Go to Figure 20G.
|
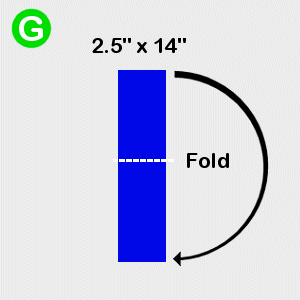 |
Figure 20G: Fold the finished panel in half. Go to Figure 20H.
|
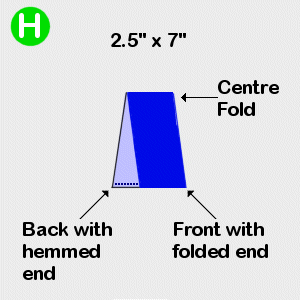 |
Figure 20H: This is the finished tab or loop ready to install upon your wall. Note the horizontal seam on the rear portion of the tab. Go to Figure 20J.
|
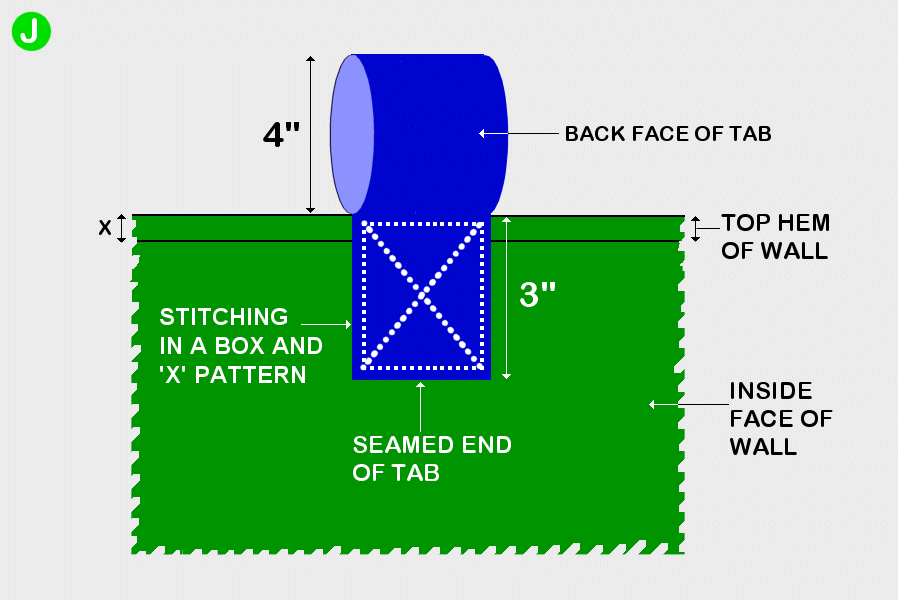
Figure 20J: When you are ready to install a tab on your wall, it is position so that the bottom 3" of it's length overlaps the wall. Pin it in place, then sew around the outside edge first. Finally put in the "X" stitch across the centre. Note that it is normal to have a stout contrasting cord forming this "X" shape but as this can only be put in by hand it is recommended that to start with you sew this in normal thread, possibly in a contrasting colour.
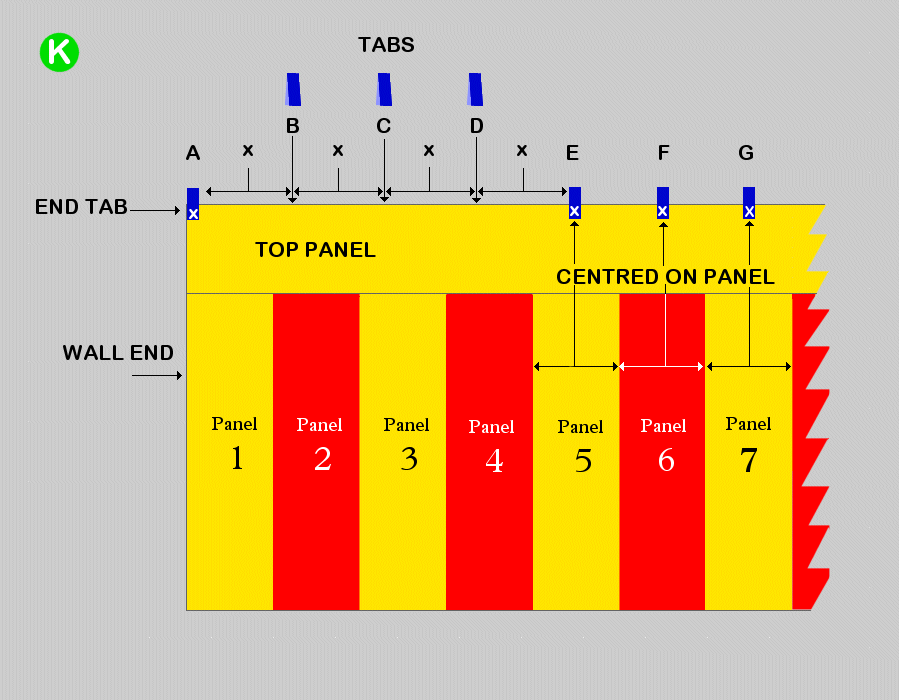
Figure 20K: This figure shows the positioning of the tabs at each end of the wall. With the exception of the last four tabs at each end, all others are centred over their vertical panel, as per E, F and G of panels 5, 6 and 7 respectively. Tab A being the anchor tab is placed at the very end of panel 1, while tabs B, C and D are position equidistant (distance X) between tabs A and E, without reference to the centres of panels 2, 3 or 4. Thus when viewed at a distance the illusion is of equally spaced tabs, but without the need to measure and mark the position of every single one in relation to the two ends of the wall. This latter laborious approach is only necessary with a wall constructed entirely of horizontal stripes, which has no visual markers like the vertical panels to help you position the tabs. When having to do this it is better to fold the cloth repeatedly in two, each time marking the midpoint. Then once the distance between marks is down to about 8-10' or so, you will find it easier to lay out the wall and measure and mark the positions of the remaining tabs. NB: the white "X" on the lower portion of the tabs A, E, F and G, represents the bold cross stitch securing it to the wall and should not be regarded as a reference letter.
AKUNOYA/AKUSHA Frame
These shelters were supported by an internal wooden frame type structure, which we intend to reproduce. However, this section can only be added, once we have worked out how to actually build it! Watch this space.
Alternative Patterns For AKUNOYA
Symetric Complex Striped AKUNOYA
This design is symetrical, being the same when viewed from either side or end. I have defined as "complex" as it has both horizontal as well as vertical stripes. It is a medium length 21 panel long by 12 panel wide AKUNOYA patterned in the traditional Chinese order of the 5 lucky colours/elements, blue (wood), red (fire), yellow (earth), white (metal) and black (water). Size: 28' long x 12' wide x 9' 8" tall.

Figure 21: Side View.
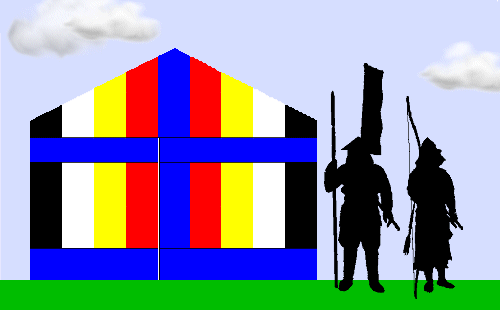
Figure 22: End View.
Asymetric Complex Striped AKUNOYA
In some illustrations of AKUNOYA the pattern continues to repeat from left to right without reversing at the mid point as per the above AKUNOYA. This means that the pattern on each end view is different from one another. This has been further highlighted by the fact that the over-lap at the centre of the eastern doorway has been drawn as right over left, rather than left over right as opposed to what I have shown elsewhere.
Figures 26-28 show an arrangement of the wall section wherein there is only a single horizontal stripe running along its top edge. To date I have not yet seen an illustration of an AKUNOYA or AKUSHA fitted with a wall like this, but JIN-MAKU of this pattern do appear. Therefore it seems possible that such a JINMAKU was at sometime made to match up to a roof section.

Figure 23: Side View.
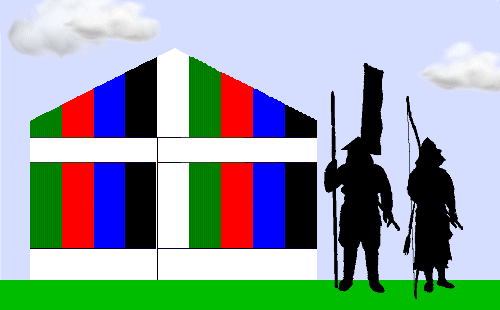
Figure 24: End View: western entrance to Figure 23.
|
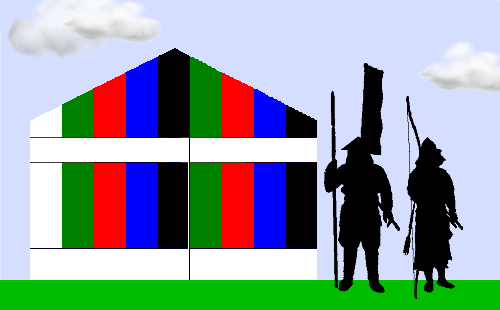
Figure 25: End View: eastern entrance to Figure 23.
|
|---|

Figure 26: Side View. a single horizontal striped wall variant of an asymetric pattern.
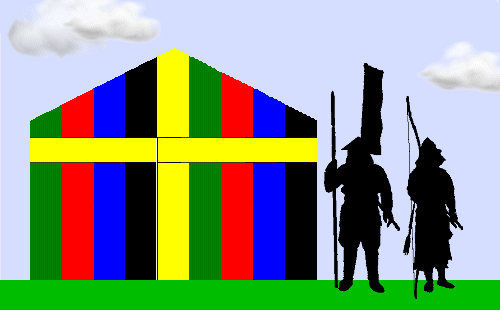
Figure 27: End View: western entrance to Figure 26.
|
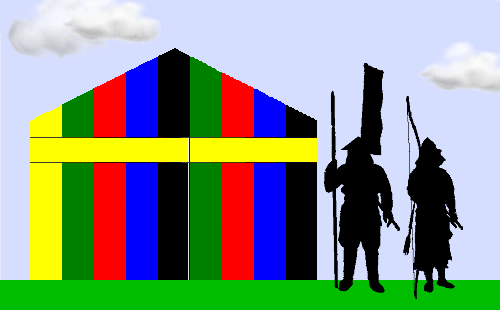
Figure 28: End View: eastern entrance to Figure 26.
|
|---|
Simple Striped Pattern Options
Many AKUNOYA are made in a very simple pattern, Figures 29-36 are just the side views of purely vertically striped tents, which are shown with 12" diameter MON painted upon their paler sections. They are all 12 x 19 panel tents, that is: 22' 8" long x 12' wide x 9' 8" tall.

Figure 29.

Figure 30.

Figure 31.

Figure 32.

Figure 33.

Figure 34.
Economy Options
Figures 35-39 are all designed to be less expensive, being of a narrower 7 panel width (9' 4"), with the first two having fewer coloured stripes (which are 25% more expensive than white ones). The first is a 7 x 17 panel tent in yellow and white, that is: 9' 4" wide x 22' 8" long x 9' tall. The other three are just the end views at the moment, the last two being slightly more pricey, due to the use of all color construction and painted MON.
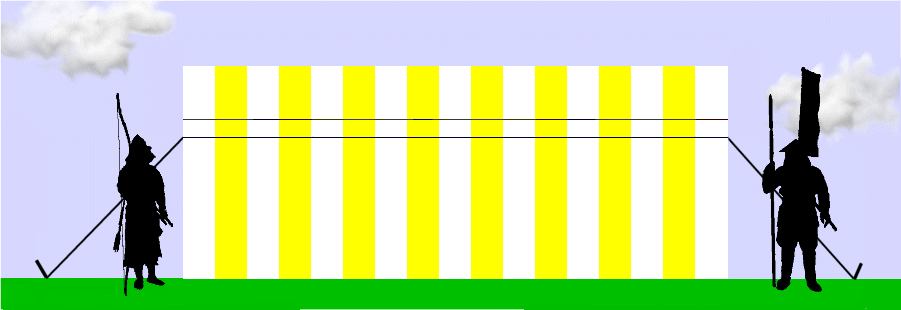
Figure 35.
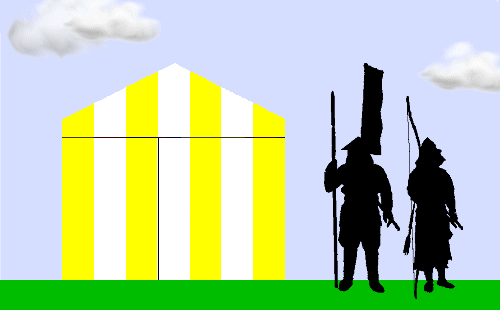
Figure 36.
|
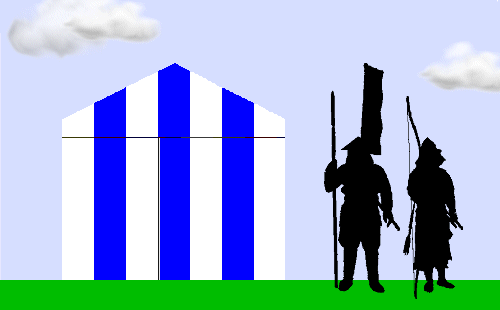
Figure 37.
|
|---|
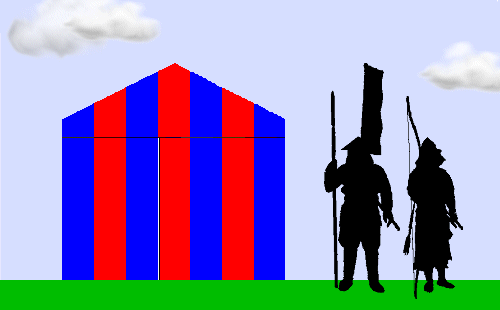
Figure 38.
|
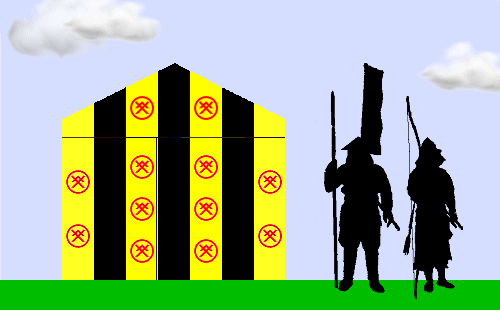
Figure 39.
|
|---|
A Grand Pavillion
And finally here is a really big purely vertically striped tent, made totally in colour, covered with white MON which would need to be created during the cloth's dyeing process. The design was inspired by the tent in the TV series "SHOGUN". It is a 25 x 11 panel structure measuring 33' long x 14' 8" wide and 9' 8" tall. This would not be cheap at all, which is why it is illustrated with its own small army!

Figure 40. Side View.
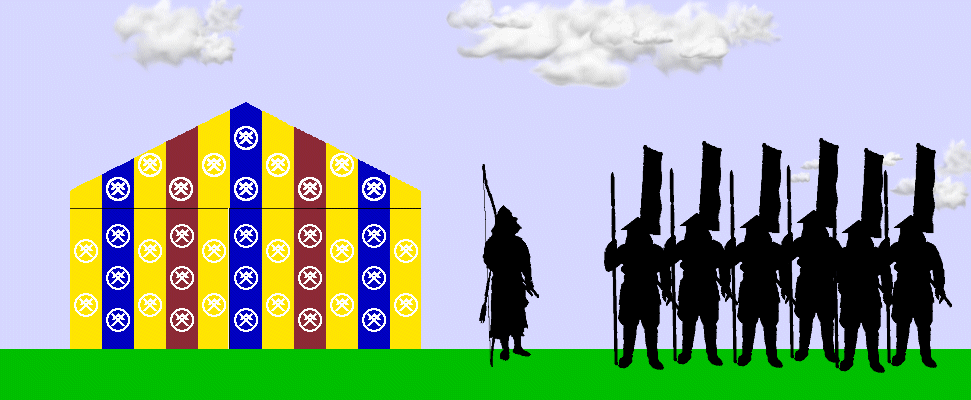
Figure 41: End View, complete with an army of ASHIGARU!
(Japanese Camp Curtains)
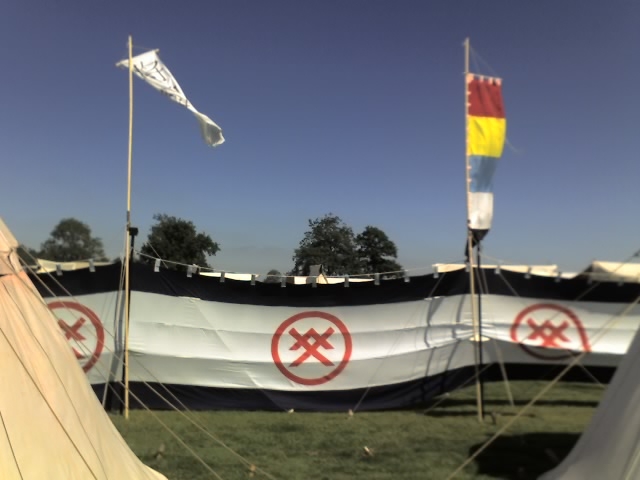
Picture 7: a photograph of our JIN-MAKU set up at the Military Odysseydisplay of 2005.
JIN-MAKU which can be translated as "camp curtains", look and function very much like a modern day beech wind-break. Not only do they provide protection from the wind, but also from prying eyes. Unlike the beech break, these tend to be far larger, typically being a circa 6' tall x 40'-45' long lightweight fabric screen, suspended by loops hanging from a rope hooked on to purpose made posts, or trees, buildings and the like. They were put up at the centre of a DAIMYŌ's headquarters when on a military campaign or for civilian service at garden parties, religious or political events, when they were termed TOBARI. Four of them can provide excellent privacy from enemy spys, requiring very few guards to secure it from approach. Sometimes an AKUNOYA/AKUSHA is set up inside in very hot or rainy weather, and can be integrated as part of the wall, thus increasing the area protected. Often numerous banners are erected within, or just outside the MAKU, indicating which notable warriors are allied under a given lord. The lord's own MON would commonly appear all over the MAKU itself in one pattern or another, see Figures 42 &: 45 below .
JIN-MAKU, are made in either vertical or more commonly by our period (1543-1640), horizontal stripes. Very early versions were made with a horizontal stripe top and bottom, with vertical ones in between, being in practise the walls of an AKUNOYA, see Figure 42 below. Prior to our period JINMAKU began to also be made with a single horizontal stripe running across the top, as an alternative to the older fashion.

Figure 42: The wall of an AKUNOYA ("tent") being used as a JIN-MAKU.
For a MAKU like ours, five "standard" 40'-45' long bolts of cloth in widths of circa 16"-18", are used to make a curtain five panels tall, and full bolt length. Incidentally this is the same size of bolt used for making a single KIMONO type garment. Ours is made of pure Irish dark and pale blue linen, 75" tall, and 42' long, and yes it is made up of five separate panels of cloth sewn together. The source material was originally 32" wide for the dark blue, and 58" for the pale.
In the field the MAKU hangs by contrasting fabric loops from a rope attached via iron hooks on circular wooden poles driven into the ground. The loops are about 4" long and spaced at a distance equal to the fabric width, circa 16",
and fitted with the same traditional extra thick "cross-knots" as seen on banners for additional security. The tops of the poles are decorated with a finial made from a wooden cube (4"x4"x4"), which have their corners cut off to produce their distinctive shape. About 8" below this is an iron hook, from which the rope is suspended. See Picture 7 above and 8 below. Poles are usually painted, ours are currently plain black, but it is planned to redo them possibly in some form of striped pattern in a bright lacquer substitute, as real Japanese lacquer or URUSHI is quite dangerous to use. For ease of installation they have a 12" steel ferall at the bottom to make it easier to get them into the earth. When used for civilian purposes TOBARI, can sometimes be seen suspended from thin horizontal wooden poles rather than a rope, which in turn sit on top of the vertical supports. For our circa 160' JINMAKU, we have 15 poles, each being 8' 6" tall and 1.6" (40mm) in diameter. NB: we do NOT hammer them in, as this damaged the first one we tried to do this too. Instead a hole is first made and the pole inserted, and normally, but not always secured by four guy lines to 15" long wooden pegs. We have no evidence for the use of guy lines on MAKU poles, but we do see them on those used for flags. And as most site owners would object to us digging the poles in deep, we elected to use the guys and pegs instead.
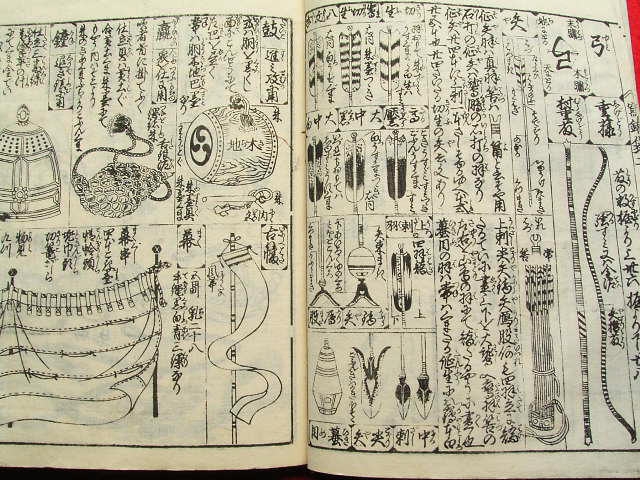
Picture 8: an illustration from a scroll showing campaign equipment. In the bottom left hand corner is a JINMAKU, the pole for which shows the cut cube finial and the gently curving iron hook. In addition to the YA (arrows), EBIRA (quiver) and YUMI (bows) on the right, you can also see a HATA JIRUSHI (a hanging flag) at bottom right, and across the top, left to right, a BONSHO, or "temple bell", a HORA, a conch shell trumpet in it's net type carrier and a large drum called a TAIKO.
Horizontal MAKU like ours, have periodic slits, that help to reduce the impact of the wind, and serve as "windows". They are arranged in groups forming a pattern starting at the top junction seam, with either 1 or 2 slits, then in a pyramid like arrangement you will find 2-3 at the next seam down as appropriate and then 3-4 below that. The lower junction seam has none, see Figure 43 & 44 below. To have a MAKU with these slits, it is best to make them authentically, that is out of five separate strips, each being fully pre-hemmed. When the slits are put in, the edges will be already turned over and hemmed, and all that is necessary is to put in a reinforcing stitch at each end of the split to both protect it and if desired to hold the window open slightly, see Figure 44 below. With regard to MON and the "windows", later on in the EDO period (1600-1867) rules were devised governing the number and arrangement of both MON and slits, and indeed what rank of warrior could use which level of slit, see Figure 45 below. So, remember, you have been warned, if you're found peaking through the wrong window at the wrong time it will probably cost you your head!

Figure 43: the MON and "windows" layout on a JIN-MAKU.

Figure 44: The assembly of the strips, and the making of a "window". Note the two versions of the reinforcing stitch: at left is a "cross-stitch" that prevents ripping but tends to keep the window closed, whereas the "whip-stitch" type holds it open, but can look less neat. (IMAGE TO BE ADDED)
Sadly, these slits didn't save one of our curtains when a gale force wind tore it and broke a pole at the 2006 Military Odyssey, despite each pole being guyed to four 15" pegs. NB: in scrolls, it is unclear whether or not guy lines and pegs are used to secure the poles, but we have found it essential. However, but as I said above there is evidence for banner poles being secured in this fashion. Currently our MAKU also does not have any ties at their end to affix them to a pole, as our only evidence has so far been a movie, but after our previous experiences, we will be adding six ties per end this year, one at each seam. On ours the MON are placed so as not to be split by a "window". Eventually each of our MAKU will have at least 3 MON, being about 36" in diameter, painted in between the 5 sets of slits. MON seem mostly to be either black or white, so as to contrast with their background, but coloured ones do exist. We decided upon red for ours, to provide some bright color on what is otherwise a sombar light and dark blue design. Vertically polarised MAKU, or those with a single horizontal stripe at their top, have the bottom 12"-18" or so of every other seam left open, again to reduce the effect of the wind. Our entire JIN-MAKU can be stored with its ropes and pegs in a single HITSU (wooden chest), measuring 19' wide by 18' deep and 25" tall, and easily carried by one person. The poles on the other hand, all 15 of them....
Putting a JINMAKU up is quite time consuming, especially if all the poles are being pegged out. Scrolls show trees and even parts of buildings being used to support the MAKU, so as to save time. Also, when the screen is overly long for a given task, its unused end can be seen unceromoniously piled up or draped across the ground. Sometimes an improvised gateway, much like a TORII made of logs is set up as an entrance to a camp, with the MAKU tied to it. JIN-MAKU, or as mentioned above, more correctly termed as TOBARI when in non-military service, can also be seen at shrines, made over-size in height with 6 horizontal panels, and similarly affixed to either side of the shrine's gateway.
Before putting your MAKU up, first lay it down along the route you wish to cover, then position your poles. When satisfied with your layout, make a loop in the rope at each pole point, make your hole in the ground and insert it. When ready to raise the MAKU, all you need to do is elevate it above the hook, and seat it there. This means that you do not need extra long arms or a box to stand on to get it in place! When taking it down, simply reverse the process. For speed we have found that leaving each panel's suspension rope threaded through its hanging loops when packing aids swift future deployment. Our guy lines are individual, four to a pole. Each has a loop at one end, for installation on the pole, in the same manner as the main MAKU's rope. Special attention must be paid to the guy line that runs out from the end of the MAKU as this takes the most strain. Incidentally, we found that securing our banner poles to the MAKU's ones reduced the number of guy lines available in camp to trip over, but this can add even more stress, especially if the wind gets up.
Finally, having built one of these very impressive devices, you must ensure that you retain a supply of spare fabric, rope and pegs, if you don't when it gets damaged it will show, fortunately for us we remembered this very important rule of fieldcraft!
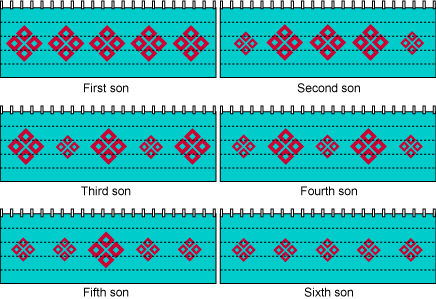
Figure 45: here are shown a set of KAMON ("family crests") for a clan's members by birth order/rank. Their use means that it is not only clear which clan HQ is being viewed, but precisely which member of that family. To what degree this was applied during our period (1543-1640) is unclear, as it is really a later EDO era fashion (1600-1868). This image also serves as a link to the only other English language web site dealing with JIN-MAKU, SENGOKUDAIMYO.COM written by Anthony J. Bryant, which also has some other nice illustrations, click his image above to go direct to his JINMAKU page.
More illustrations etc. will be attached to this part of the page as soon as they are ready.
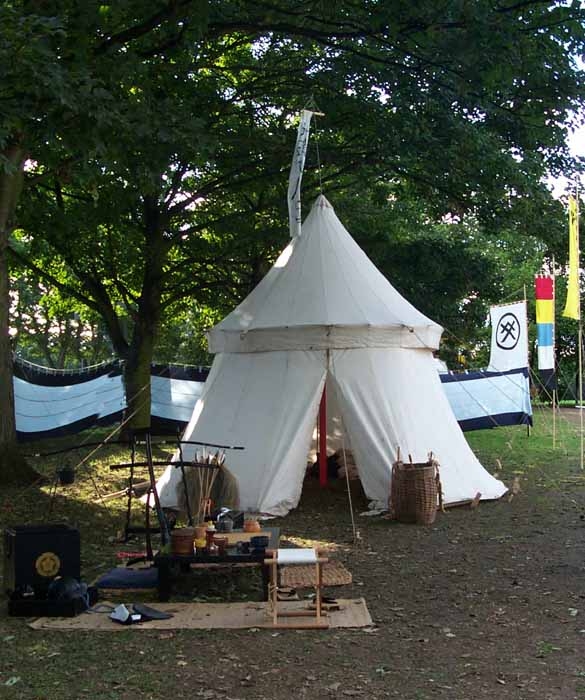
Picture 9: Our white pavillion, set up in a Japanese camp, with curtain (JIN-MAKU) and banners in the background. This was the second of two tents made by myself and mainly David Gavin (aka "Dag"), back in 1988. The first, the less than subtle so-called "pink tit" being built 2 years earlier for use in the now defunct White Company (Wars of the Roses 15th century re-enactment society).
European tentage was incredibly varried, in its materials, colours, sizes and shapes. Ranging from small 1 to circa 10 person "soldier's" tents through to "great pavillions" intended as accomadation or entertainment venues for the wealthy.
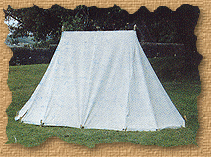
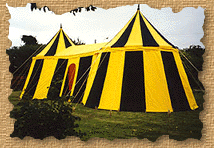
Picture 10: A comercial replica of a 17th century "Soldier's" tent in the Graz Armoury Museum in Austria. Size 12' x 6' 6" x 6". Click the image to go to the "Civil War" pagePast Tents web site for more details.
The former were very simple having a frame of two vertical poles, possibly with a ridge pole (dependent upon size), and a single canvas structure arranged as an inverted "V", with either flat or more often rounded (bell) ends. These look much more like a modern tent, however the entrance was typically in the side, where either an arched "doorway" or a simple slit was fitted. Larger examples (9'-12' tall) sometimes had an awning, extending out over the doorway supported upon an additional pair of poles. This style used few guy lines, but was extensively pegged down around its edge. Smaller versions were often plain white, whereas the larger ones were commonly made in two contrasting stripes, with heraldic badges painted upon their surfaces, although this practise reduced over time, due to the large sizes of European armies and the resulting costs of kitting them out in the 16th & 17th centuries.
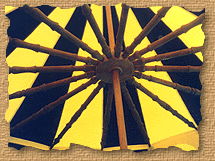
Picture 11: The "cartwheel" used in Past Tents' round pavillions. Click the image to go to the "non-frames" home pagePast Tents web site for more details.
The grander great pavillion style of tent were made normally in two separate parts, the wall and a roof panel. They are supported by a single stout pole at their centre with a "cartwheel" like structure at the base of the roof line. This comprises of a wooden hub, with spokes that engage with the canvas, to make an almost rigid structure. Our larger one (top of this section) has 20 spokes that terminate in iron spikes that pass through holes in the fringe of the roof. The wall is then tied to these spokes, and pegged out on the ground. The junction of the wall ends forms the doorway, which in some cases was shaped in to a arch and provided with another panel to serve as "door". This design makes use of a larger number of guy lines, our big one has 10, whereas our smaller 12' ground base diameter "pink pavillion" has 12 guys.
These pavillions are sometimes in plain cloth, but normally striped, or when the owner was of high status painted with heraldry, and fitted with a flag or other device at the apex. The fringe, the portion of the roof that overlapped the wall, was also sometimes finished in various decorative shapes, such as "dagging" (like a saw-tooth pattern). Very elaborate models, were made of brocade, and could be composed of two or three pavillions joined together with short corridors, thus creating a suite of rooms, see below.
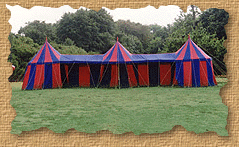
Pictures 12 & 13: Two comercial replicas of early 16th century "Tudor" great pavillions. At left a double turret model from the painting of "The Field of The Cloth of Gold" (1520). Size: 32'L x 14'W x 13"H, and a Burgundian tripple turreted model at right. Size: 60'L x 16' W x 13'H. Click the left hand image to go to the Past Tents' "Medieval" page, and the right hand one for their "Specials" page.
These great pavillions had at least a ground diameter of 10', while a medium to large form, would, like ours (Picture 9 above) be 16' across or bigger at its base. Also ours is 10' in diameter at the bottom of the roof section and 13' tall, excluding the 5' flag pole.
Square or rectangular tents once again began to appear on the European battlefield during the late 16th and early 17th centuries, usually in the posession of officers. These could have pitched or pyramidical roof sections, usually had elaborate doorways.
Incidentally the reason why our larger pavillion is plain white, was that at the time it was made by us in 1988, we were unable to source any suitable coloured fabric, and we intended, but never got around to what would have been the very expensive task of painting it. We had chosen to do this as our 1985 experiment in dying resulted in our smaller tent ending up as the "pink pavillion", it was supposed to be red and yellow! For our next tent, the Japanese "great pavillion" we are commissioning John Waterhouse of Past Tents to build the fabric components - a very wise choice.
End of Page

